APIs (Application Programming Interfaces) are the foundation for data communication between software systems. From social media platforms to payment gateways, APIs enable software applications to exchange data and perform various functions efficiently. Testing these APIs ensures they work seamlessly, consistently, and securely.
In this Postman tutorial, we'll walk you through the entire process of API testing using Postman, one of the most powerful and beginner-friendly API testing tools available today. We will cover everything from installing Postman to automating API tests and implementing best practices.
By the end of this blog, you'll be fully equipped to handle API testing like a pro 💪!
🧑💻 Introduction to API Testing
API testing ensures that APIs work as expected under various conditions. Unlike UI testing, which focuses on the interface, API testing verifies backend services that handle critical tasks like data processing, security, and communication between systems. Since APIs are platform-independent, testing them ensures smooth integration across applications.
What is API Testing? 🤔
API testing involves sending requests to an API, receiving responses, and validating data, performance, and functionality. It helps ensure:
- Data Validation: Verifying that returned data is accurate and properly formatted.
- Security: Checking for vulnerabilities like unauthorized access.
- Error Handling: Ensuring correct error messages are returned for invalid requests.
- Performance: Measuring API response times under different loads.
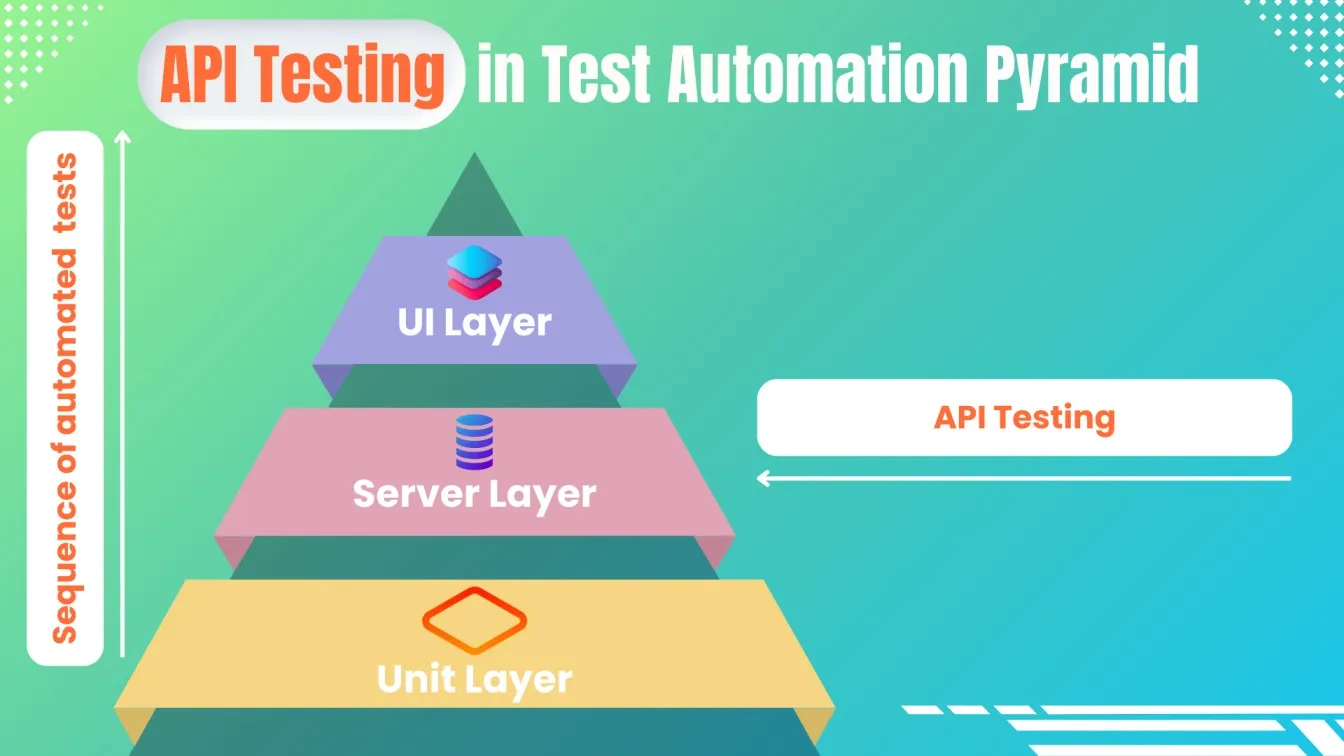
For example, imagine you're testing an API for an e-commerce app. You need to ensure that when a user places an order, the correct order details are sent to the backend and the appropriate response (order confirmation or failure) is returned. 🛒
Why Use Postman for API Testing? 🌟
Postman is a popular tool for API testing thanks to its user-friendly interface and powerful features. Here’s why:
- No Setup Hassles: Postman requires minimal setup compared to other testing frameworks.
- Support for All API Types: It works with GraphQL, SOAP, and REST APIs.
- Intuitive Interface: You can easily manage requests and view responses side by side.
- Collection Runner: Automate and run multiple tests at once, saving time during automation tests.
- Advanced Features: Supports pre-request scripts, response assertions, and multiple api authentication methods for complex test scenarios.

🛠 Getting Started with Postman
The Postman tool is available as a desktop application and a web-based platform, so you can choose whichever suits your needs. Once you’ve set it up, you'll find that the interface is clean, intuitive, and designed to help you focus on testing without distractions.
How to Install Postman 🖥️
Getting started with Postman is a straightforward process:
- Download Postman: Head over to Postman’s official download page and choose the version for your OS (Windows, macOS, or Linux).
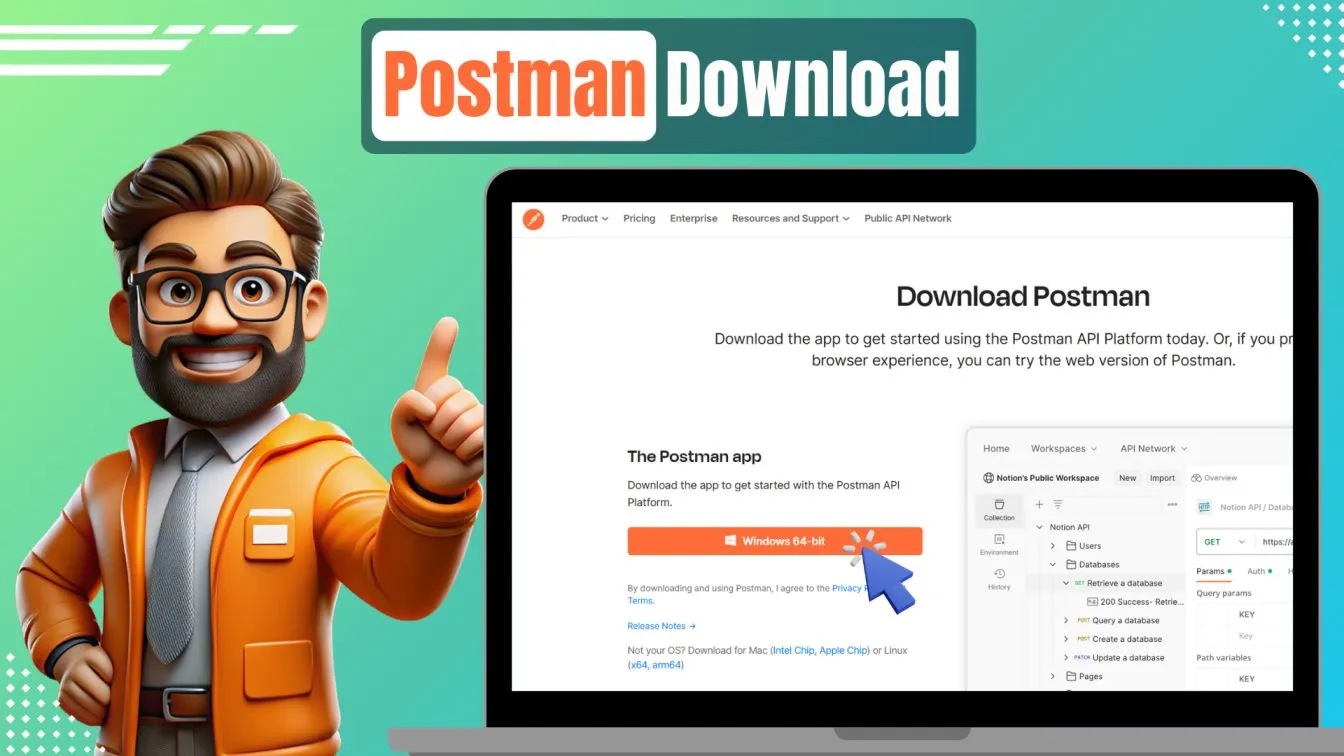
- Install: Once downloaded, run the installer and follow the instructions. The process is seamless and doesn’t require additional software.
- Sign Up or Log In: When you launch Postman, you can sign in with your existing account or create a new one. Signing in allows you to sync your API collections and work across multiple devices.
- Explore the Workspace: Postman offers a free tier, but if you're working on a large team or project, you might consider upgrading to access additional features like enhanced collaboration tools, monitors, and more storage.
Once installed, you can start creating and running API tests instantly! 🎉
Overview of Postman’s Interface 🖼️
When you open Postman for the first time, you'll see a dashboard with several key areas:
- Request URL Field: Enter the API endpoint URL here.
- Request Methods Dropdown: Select the type of request (GET, POST, PUT, DELETE).
- Request Body & Headers Tabs: Add request headers, parameters, and body data here.
- Collections Tab: Here, you can organize your postman requests into collections for better management. This is especially useful for grouping related API calls, such as user-related or order-related APIs.
- Response Viewer: After sending a request (request execution), the server’s response, including the body, headers, and status code, will appear in this panel. You can format or inspect the data as JSON, HTML, or raw text.
- Test Script Area: Postman lets you write pre-request scripts and post-request scripts using JavaScript to automate tasks like setting environment variables or validating responses.
- New Request Tab: This is where you can create new API requests (e.g., GET, POST, PUT).
- History Tab: Keeps track of your previously executed requests, allowing you to re-run or review past tests.
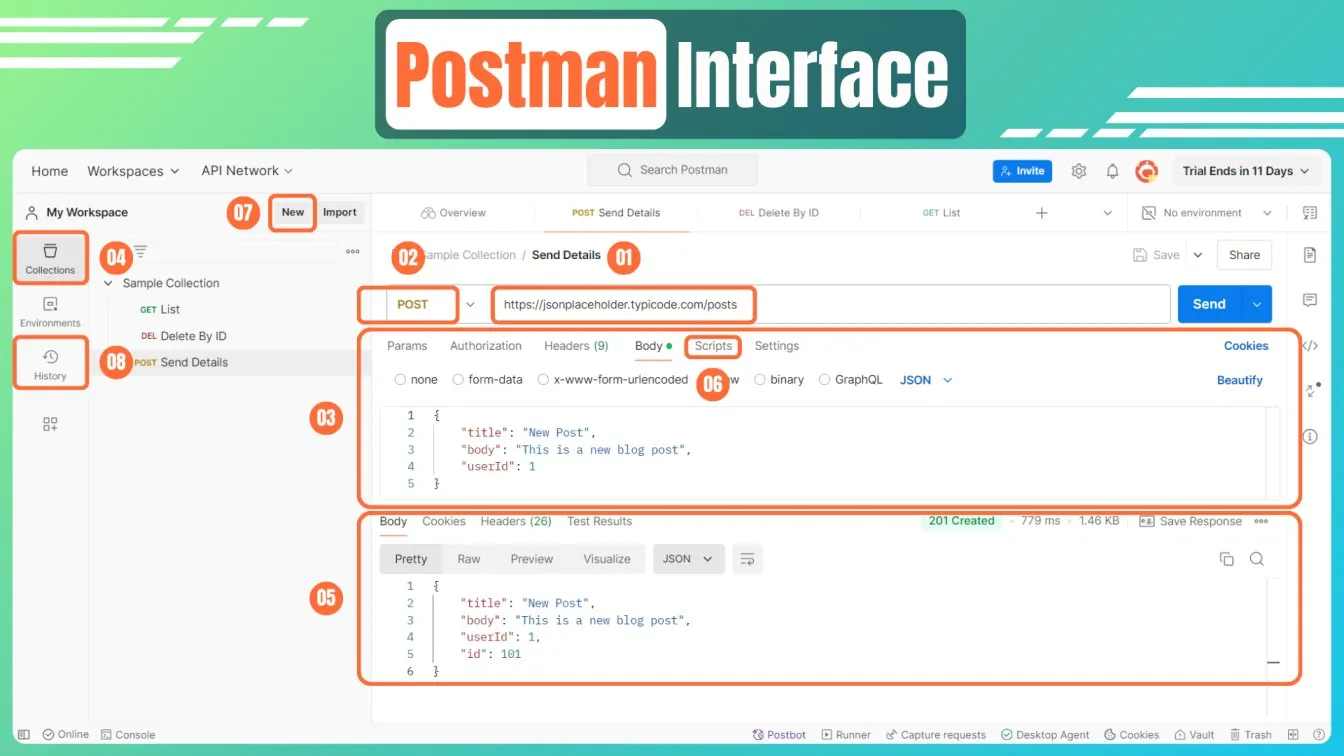
Exploring the interface thoroughly will give you a better understanding of Postman’s power and flexibility. Don’t worry - it’s user-friendly, and you’ll quickly feel at home 🏡!
📡 Creating Your First API Test in Postman
Creating your first API test in Postman is simple and requires just a few clicks.
Setting Up a Request 📝
- Sign up or log in to Postman.
- Create or select a workspace to organize your API tests.
- Click New in the top-left corner and select Request.
- Name your request and assign it to a collection (optional).
- Choose the HTTP method (e.g., GET, POST, PUT, DELETE).
- Enter the API URL in the URL bar (e.g., https://jsonplaceholder.typicode.com/posts).
Once the URL and method are set, you can configure other parameters.
Adding Parameters, Headers, and Body Data 📦
Depending on the API you’re testing, you may need to add parameters, request headers, or body data to your request details.
- Parameters: Add parameters in the Params tab to filter your request (e.g., ?userId=1).
- Headers: Add metadata like Authorization tokens or Content-Type in the Headers tab.
- Body Data: For POST or PUT methods, enter the data in the Body tab (e.g., JSON or form data).
Once your request is ready, click the Send button to make the API call 🚀!
🔄 Types of API Requests in Postman
API requests typically involve performing different operations such as retrieving data, creating new resources, updating existing data, or deleting records. Here’s a closer look at some common HTTP methods you’ll use when working with APIs.

GET Requests for Retrieving Data 📥
GET requests are used for fetching data from an API. This is the most basic type of request, and it's often the first thing you’ll test when working with an API. For example, if you’re testing a weather API, a GET request might return the current temperature in a specific city.
GET Request Example:
- Endpoint: https://jsonplaceholder.typicode.com/posts
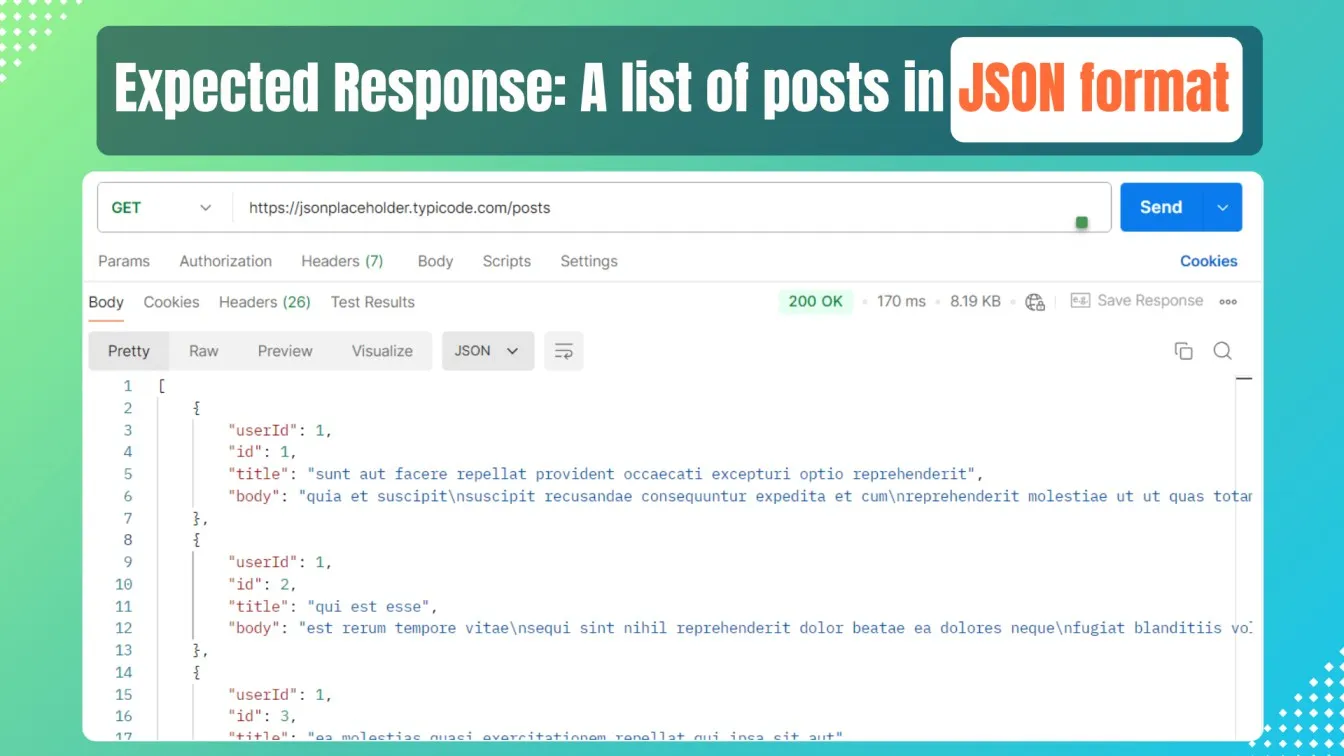
- Use Case: Fetching a list of users, retrieving specific data based on parameters like ?userId=1, or getting information from a third-party service.
POST Requests for Sending Data 📤
POST requests are used to send data to the server, typically to create a new resource. This is particularly useful when you're testing form submissions or data creation workflows, such as signing up a new user.
POST Request Example:
- Endpoint: https://jsonplaceholder.typicode.com/posts
- Request Body in Post:
{

    "title": "New Post",

    "body": "This is a blog post",

    "userId": 1

}
- Use Case: Submitting a form, uploading a file, or posting a comment.
PUT and DELETE Requests for Data Modification 🛠️
- PUT: This method updates an existing resource. If a user changes their profile information, a PUT request can update their name, email, or other details.
- DELETE: Used for deleting resources, such as removing a user from a system or deleting a comment.
- DELETE Request Example: A DELETE request to https://jsonplaceholder.typicode.com/posts/1 will remove the post with an ID of 1.
These requests allow you to manage data effectively and test the integrity of CRUD (Create, Read, Update, Delete) operations within your API.
📋 Validating API Responses in Postman
Once you've sent a request to the API, the next step is to validate the response to check the request status. Postman makes this process simple by providing a detailed view of the response body, headers, and status codes.
Understanding Status Codes 🟢🔴
One of the first things you'll notice in the response is the status code. These codes tell you whether it was a successful request or if there was an issue. Here are some common API status codes you’ll encounter:
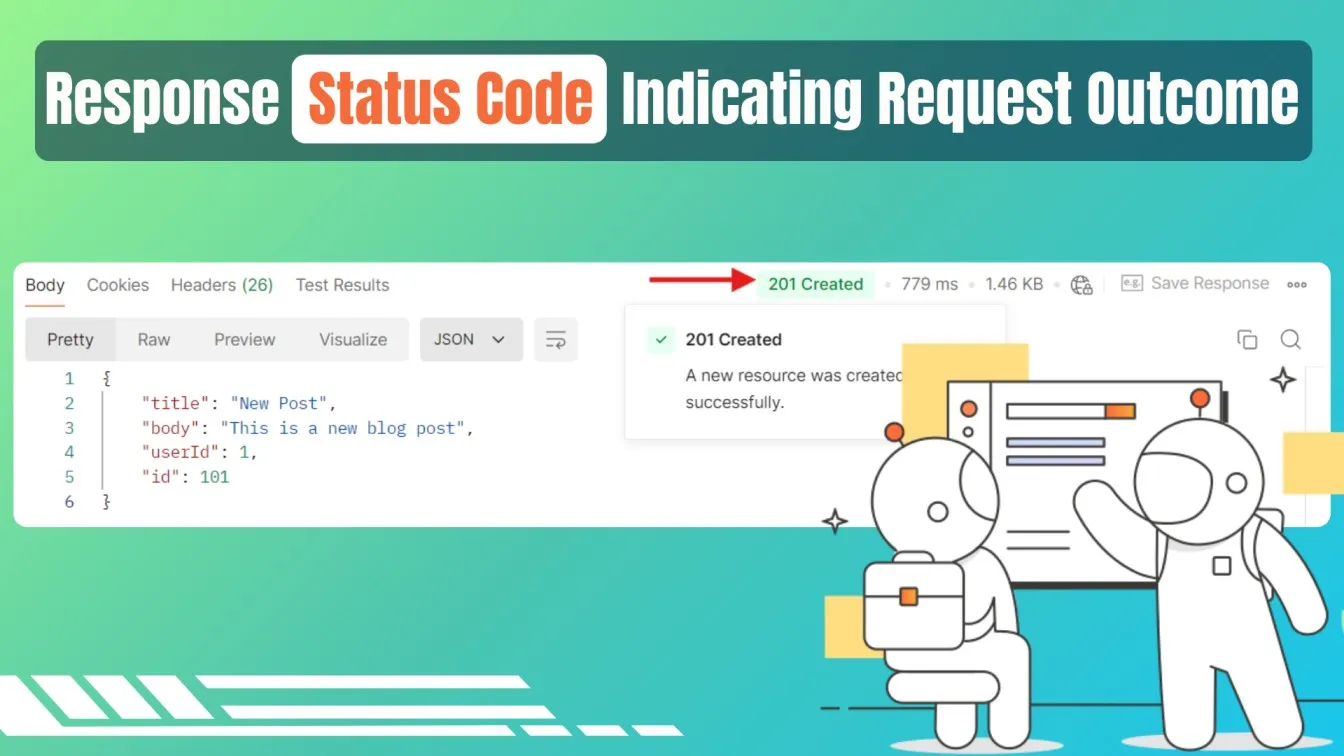
- 200 OK: The request was successful, and the server returned the data requested.
- 201 Created: A resource was successfully created (usually in response to a POST request).
- 400 Bad Request: There was something wrong with the request (like missing request parameters or invalid syntax).
- 401 Unauthorized: The request requires user authentication (e.g., missing or incorrect API token).
- 404 Not Found: The resource requested cannot be found.
- 500 Internal Server Error: On the server side, something went wrong.

By checking the status code, you can immediately identify whether the API behaved as expected.
Working with Response Body and Headers 🧾
After sending a request, Postman displays the response body, which contains the actual data returned by the API. The format of the response could vary depending on the API, but most modern APIs return data in JSON format.
- Response Body: This is where you’ll see the actual data sent back from the API. For example, a GET request to fetch user information might return a JSON response like:
{

  "id": 1,

  "name": "John Doe",

  "email": "johndoe@example.com"

}
You can view this data in multiple formats: raw text, formatted JSON, or even as a preview (if it’s an HTML response). Postman also allows you to search within the response body or response parameters to quickly locate specific fields.

- Response Headers: Provide metadata, such as Content-Type (e.g., JSON) or Cache-Control. These help you understand the format and caching rules.
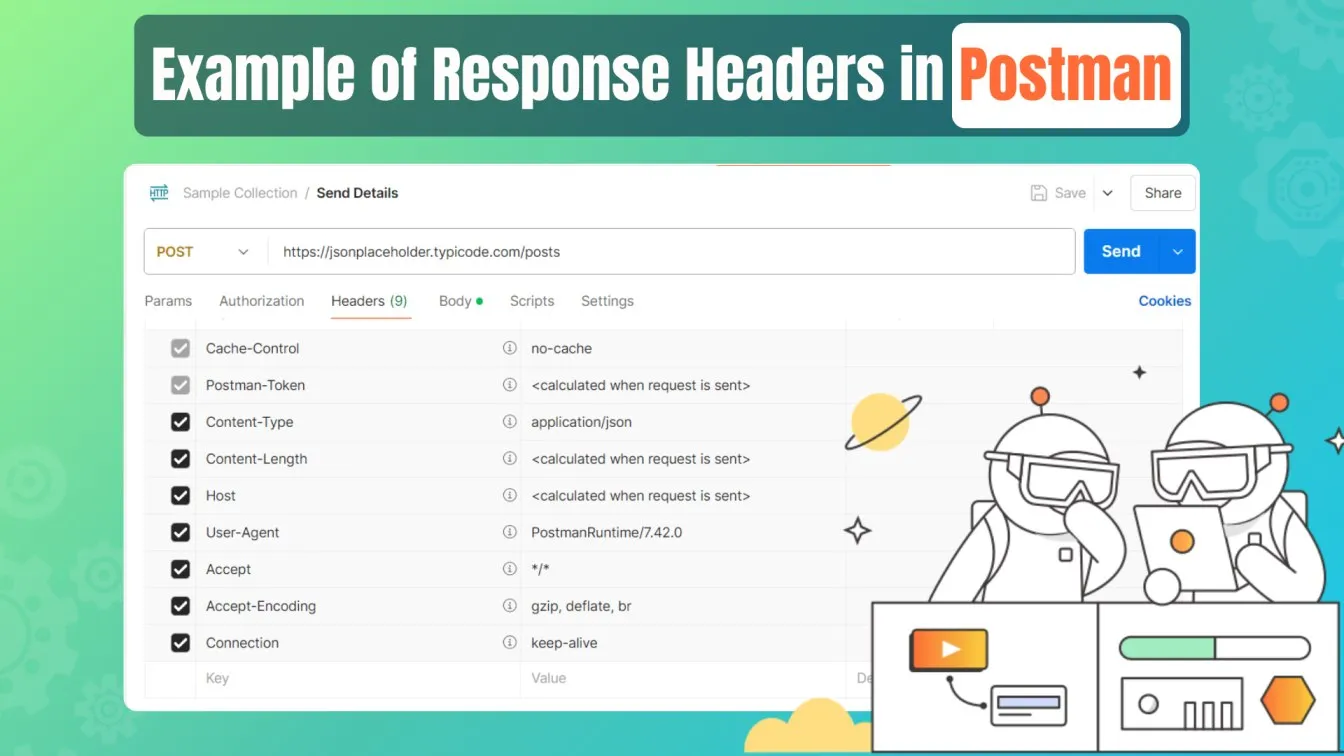
Using the status codes, headers, and response body, you can ensure the API returns the correct data. Postman also lets you automate validation with test scripts.
🤖 Automating API Tests with Postman
Automation is key when it comes to efficient testing. Instead of manually running tests for each API request, Postman allows you to write scripts that run automatically after sending a request. This is particularly useful for multiple API endpoint execution or need to perform regression tests.
Writing Scripts for Test Automation 🧑💻
Postman provides a test editor where you can write JavaScript code to validate the response. This Postman test execution runs after the request is completed, and you can use them to check things like status codes, response times, or the presence of specific fields in the response.
For example, to check if the response status code is 200 (OK), you can write the following script in the Tests tab:
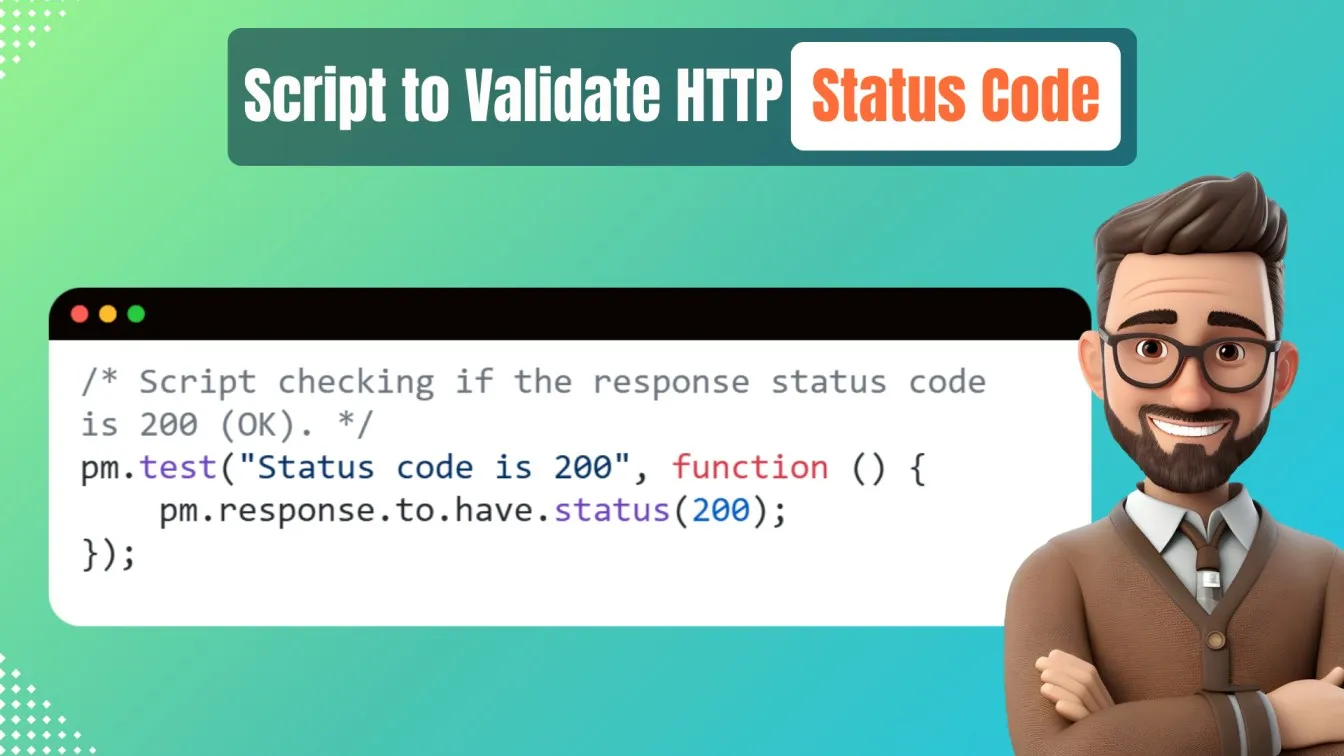
You can add multiple tests in the script, such as:
- Validating JSON Structure: Make sure certain fields exist in the response.

- Checking Response Time: Ensure that the API responds within an acceptable time frame.

These scripts help automate the validation process and ensure that the API performs consistently.
Running Collections and Scheduling Tests 📅
Postman’s Collection Runner allows you to execute multiple tests at once, organizing them into collections. This is useful for bulk testing or running a sequence of tests. You can also schedule your tests to run at specific intervals using Postman’s integration with CI/CD tools, allowing you to automate your API testing techniques in continuous integration and continuous development pipelines.
- Creating a Collection: Organize related requests into collections for specific API testing workflows, like user management (e.g., create, fetch, update, delete users).
- Running the Collection: Use the Runner to execute all requests in a collection, with options for multiple iterations, great for load testing.
- Scheduling Tests: Postman’s Monitors allow you to schedule tests at set intervals (e.g., daily/weekly), helping monitor APIs in production.
By collection tests, you can save time, reduce manual errors, and ensure that your APIs are functioning correctly over time. 🤖✨
How Postman’s Postbot Can Help You Generate Tests
Postman’s Postbot is an AI-powered feature that makes generating test scripts faster and easier. Here’s how Postbot can help:
- Auto-generating Test Scripts: Postbot automatically writes code for tests for common checks like status codes, response times, and JSON field validation.
- Suggested Tests: Based on the API response, Postbot recommends tests that you might otherwise miss, improving test coverage and accuracy.
- Reduces Human Errors: With Postbot generating tests, you avoid manual mistakes, especially useful for beginners unfamiliar with scripting.
- Learning Tool: As Postbot generates tests, you can learn by reviewing how the API test scripts are structured, making it easier to write your own in the future.
- API Documentation: Postbot helps document test scripts within Postman, making it easier for teams to understand API workflows and ensuring accurate API documentation.
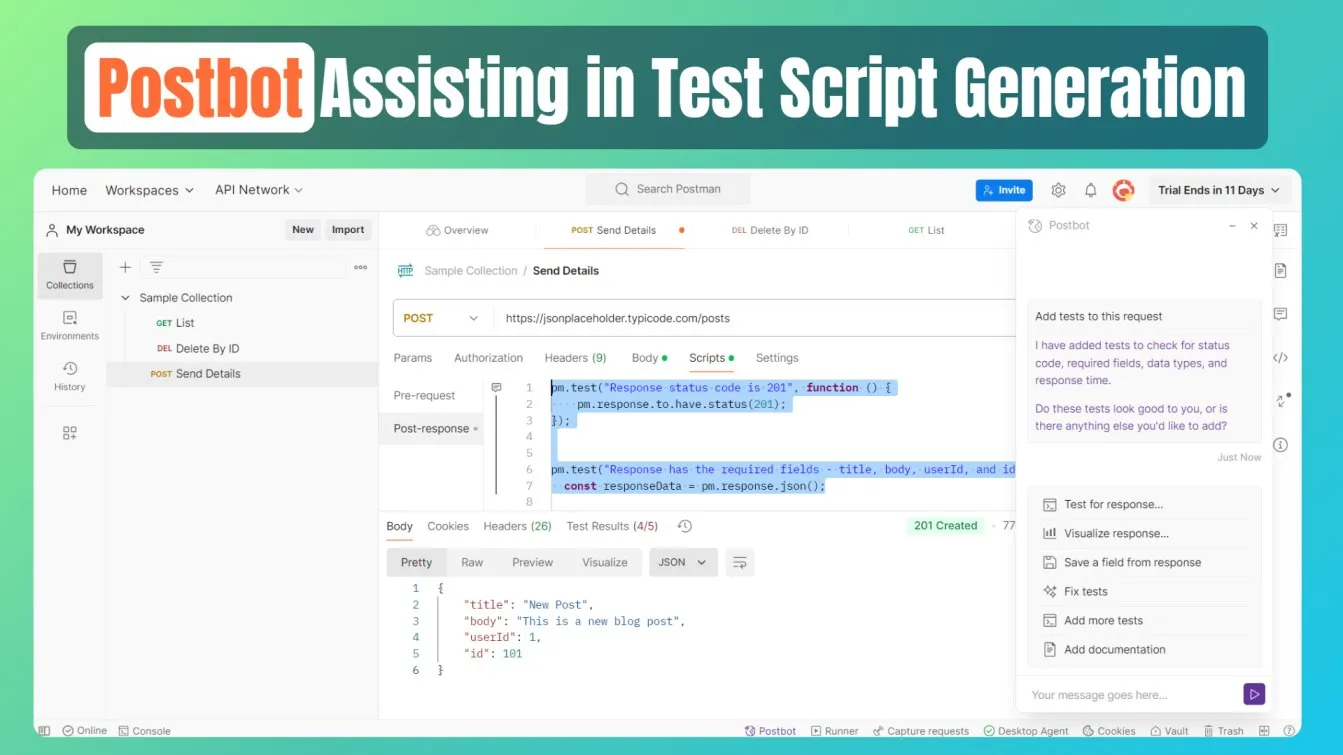
Postbot simplifies and enhances your API testing, making it faster and more efficient!
🌟 Best Practices for Efficient API Testing with Postman
To make the most out of Postman and ensure your API tests are effective, here are some best practices to follow:
- Use Environment Variables: Store common variables like base URLs, API keys, and tokens in environment variables for easy reusability.
- Organize Requests in Collections: Group related requests into collections for better organization and reusability.
- Use Pre-Request Scripts: Write pre-request scripts to automate tasks like generating tokens or setting dynamic values.
- Validate Responses with Assertions: Always write tests to verify that the response meets expected conditions, such as status codes and content.
- Leverage Automation Testing: Use Postman’s Collection Runner and scripting capabilities to automate repetitive tasks, reducing manual effort and improving efficiency.
By following these best practices, you’ll ensure that your API testing process is efficient, scalable, and reliable. 🏆
Summing up! 🚀
Postman is a versatile and powerful tool of choice for API testing, from sending basic http requests to automating complex test scenarios. By following this tutorial, you’ve learned how to set up Postman, create different types of API requests, validate responses, and automate your API tests. Now you’re ready to explore more advanced features of Postman, such as environment variables, mock servers, and monitoring, and apply them to your API testing projects. Keep experimenting and building your skills. API testing is an essential part of ensuring robust and reliable software applications.
Postman requests are an essential part of API development, enabling developers to test, debug, and optimize their APIs efficiently. With Postman, creating a simple request is straightforward, allowing you to configure headers, parameters, and body data with ease. This streamlined approach supports seamless testing workflows, from basic HTTP methods like GET and POST to more complex operations. By integrating Postman into your continuous integration pipelines, you can automate testing and ensure that your APIs remain reliable and performant, saving time and reducing errors in the development process.
Now that you’ve learned how to set up, run, and automate API tests with Postman, it's time to apply these skills to your own API projects. Happy testing! 🎉
People also ask
👉Which tool is mostly used for API testing?
Postman is widely used for API testing due to its simple interface and powerful features, like testing requests, validating responses, and automating tests.
👉Can a manual tester learn API testing?
Yes, manual testers can start with basic API testing, like testing simple request URLs and analyze the response body or actual response size using Postman and, over time, learn more advanced techniques.
👉Does Postman offer collaboration features for teams?
Yes, Postman is a collaboration platform with collaboration capabilities which allows teams to share collections, environments, and scripts, making it great for collaboration among team members.
👉Can Postman generate code snippets for my API requests?
Yes, Postman can generate code snippets for your requests, which helps integrate tests into other workflows.
👉Can I use Postman for handling complex API scenarios?
Absolutely! Postman handles bulk requests, validates actual response bodies, and offers assertions on response data making it suitable for complex scenarios.


%201.webp)
