Gaining proficiency with Jira Workflows is essential for improved team productivity and smooth project management. This guide is intended to help you handle workflows like an expert, regardless of your level of experience with Jira.
We'll cover everything you need to know, from utilizing automation and sophisticated customization to comprehending workflow statuses and transitions. By the end of this blog, you will have useful knowledge to create scalable, effective workflows that are customized to the requirements of your team
. Are you prepared to revolutionize your agile project management methodology and fully utilize Jira's potent tools? Together, we can explore the realm of workflows and advance your projects.
An excellent read for anyone exploring:
📌 Understanding Workflows: Key concepts like statuses, transitions, and schemes.
📌 Customization and Automation: Step-by-step guides and automation tips.
📌 Boosting Collaboration: Enhance teamwork with optimized workflows and integrations.
📌 Solving Challenges: Practical fixes for common workflow issues.
📌 Advanced Features: Master properties, conditions, and post functions.
Introduction to Jira Workflows for Project Management
Jira Software is a unique tool in the field of project management, providing strong features for both agile workflow and traditional project management. Its Jira workflow, a systematic series of statuses and transitions that direct tasks from start to finish, is essential to its effectiveness.
Through customization of these workflows, teams can improve efficiency and clarity by matching procedures to particular project requirements.

It's critical to comprehend and optimize workflows if you're using Jira Work Management for business projects or Jira Service Management for IT operations.
Using Jira's automation features further simplifies work, cutting down on errors and manual labor. In addition to increasing productivity, Jira workflow mastery guarantees smooth team collaboration.
Understanding Jira Workflow Statuses
Jira workflow statuses, which allow teams to easily track tasks throughout their lifecycle, are the foundation of efficient project management.
With statuses like "To Do," "In Progress," or "Done," each one clearly indicates the current state of a problem and improves visibility overall.
Jira gives administrators the ability to personalize statuses and workflows to meet the unique requirements of each project for optimal flexibility.
Statuses are linked through transitions, ensuring smooth movement between stages, while clear definitions support accurate reporting and informed decision-making. Well-structured statuses also promote collaboration by keeping team members aligned.
Different workflows use statuses uniquely:
- Agile Development: “Backlog,” “To Do,” “In Progress,” “In Review,” and “Done.”
- Bug Tracking: “Reported,” “Under Investigation,” “Fixed,” and “Verified.”
- Content Creation: “Ideation,” “Writing,” “Editing,” “Approved,” and “Published.”
- Service Management: “Waiting for Support,” “Waiting for Customer,” and “Escalated.”
Keep statuses concise and descriptive to maintain clarity and workflow efficiency. Mastering Jira workflow statuses empowers teams to streamline processes, improve communication, and achieve project goals effortlessly.
Exploring Jira Workflow Transitions: Connecting Statuses
The activities that change issues from one state to another in Jira are known as workflow transitions, and they serve as a useful link between various project lifecycle stages. Maintaining a smooth and effective workflow requires an understanding of and ability to configure these transitions.
- Definition of Transitions: Transitions are defined as the change from one state to another, for as when an issue goes from "In Progress" to "In Review."
- Customization: Jira improves workflow flexibility by enabling administrators to design unique transitions based on particular project requirements.
- Conditions and Validators: Implementing conditions ensures that only authorized users can execute certain transitions, while validators check that necessary inputs are provided before a transition occurs.
- Post Functions: These are automated actions that occur after a transition, such as updating fields or sending notifications, streamlining processes and reducing manual effort.
- Global Transitions: These allow issues to transition to a specific status from any other status, providing flexibility in workflow design.
By effectively configuring workflow transitions, teams can ensure that issues progress smoothly through their lifecycle, leading to improved Jira project management and team collaboration.
Assigning Workflows to Issue Types with Workflow Schemes
In Jira, effectively managing diverse tasks requires assigning specific workflows to different issue types. This customization is achieved through workflow schemes, which map workflows to issue types within a project.
- Understanding Workflow Schemes: A collection of relationships between problem kinds and workflows is called a workflow scheme. It enables you to choose which procedure is appropriate for any kind of project issue. A "Bug" problem type, for example, can have a different workflow than a "Task" or "Story."
- Creating a Workflow Scheme: To create a workflow scheme, navigate to Jira Administration > Issues > Workflow Schemes, and select Add Workflow Scheme. Provide a name and description, then add existing workflows and assign them to the desired issue types.
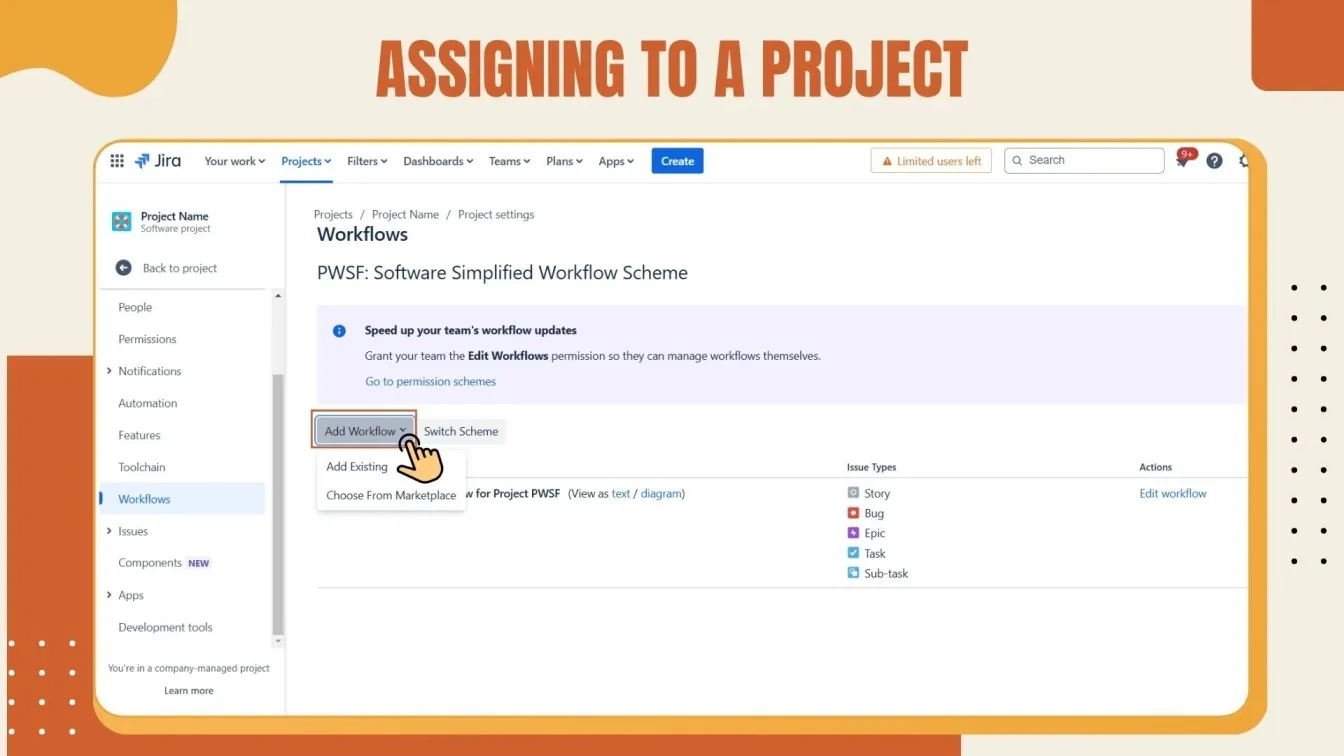
- Assigning the Scheme to a Project: Once configured, associate the workflow scheme with your project by navigating to Project Settings > Workflows, and selecting Switch Scheme. Choose your newly created scheme to apply the specific workflows to the corresponding issue types.
By utilizing workflow schemes, you can tailor workflows to fit the unique processes of each issue type, enhancing project management efficiency and clarity.
Creating and Customizing Jira Workflows: A Step-by-Step Guide
Customizing Jira workflows can transform your team’s project management. Let’s break it down into actionable points for clarity.
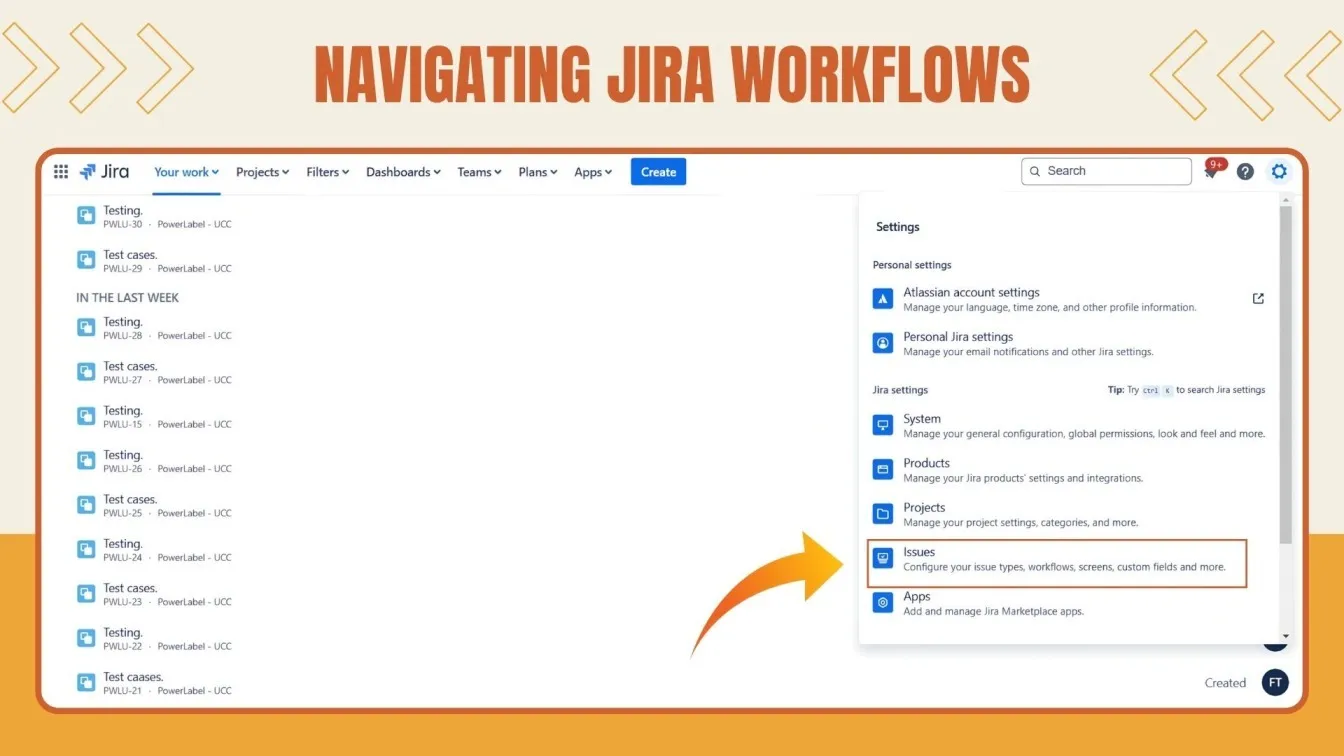
- Accessing Jira Workflows:
- Log in with administrative access.
- Go to Settings (gear icon) > Issues.
- Navigate to the Workflows section to manage or create workflows.
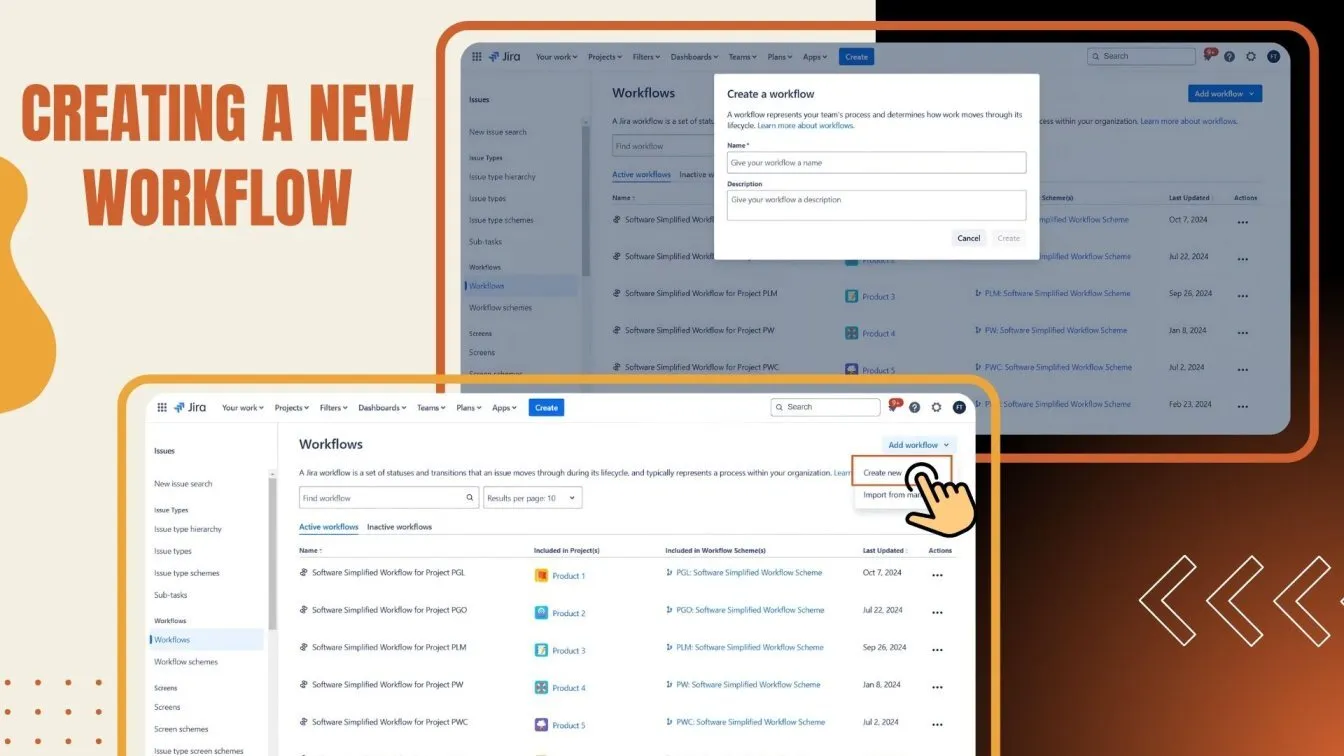
- Creating a New Workflow:
- Click on Add Workflow and give it a descriptive name.
- Provide a clear purpose for the workflow, e.g., “Bug Fix Process” or “Content Review Workflow.”
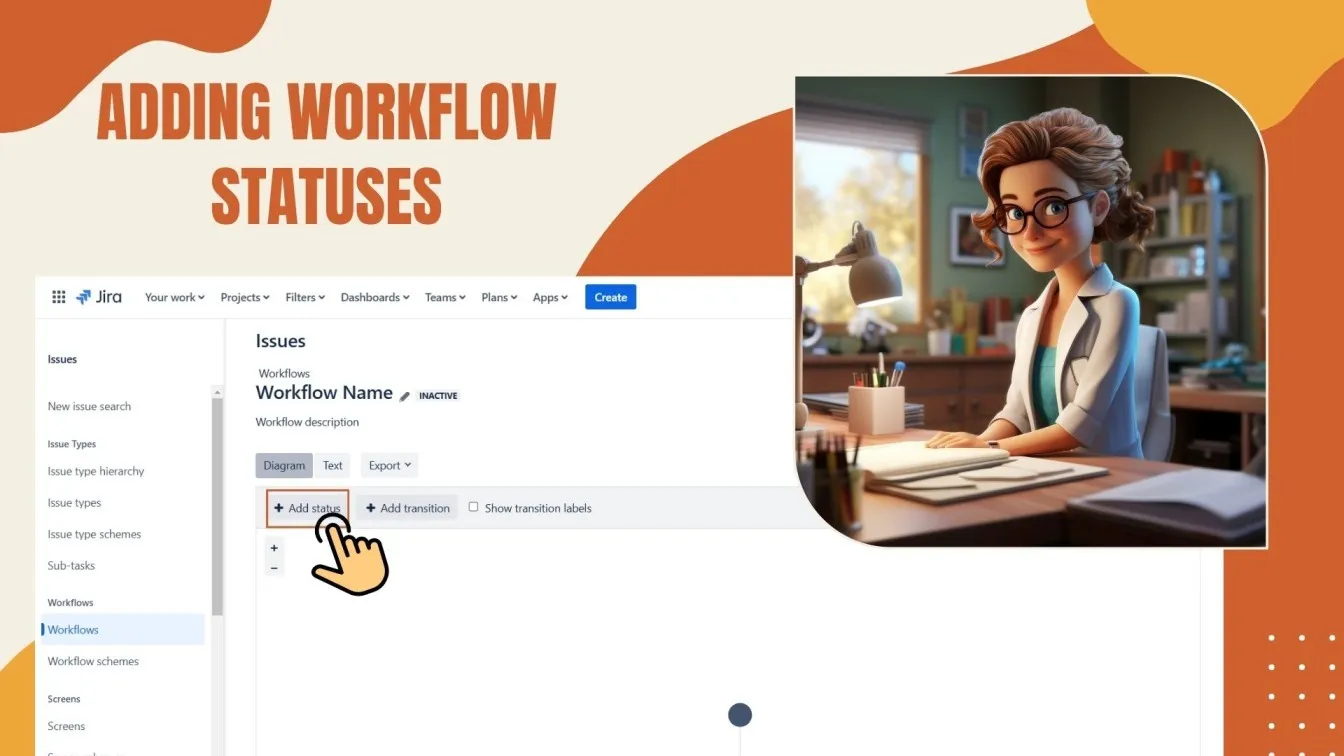
- Adding Workflow Statuses:
- Identify stages like "To Do," "In Progress," "Done," etc.
- Use existing statuses or create new ones as needed.
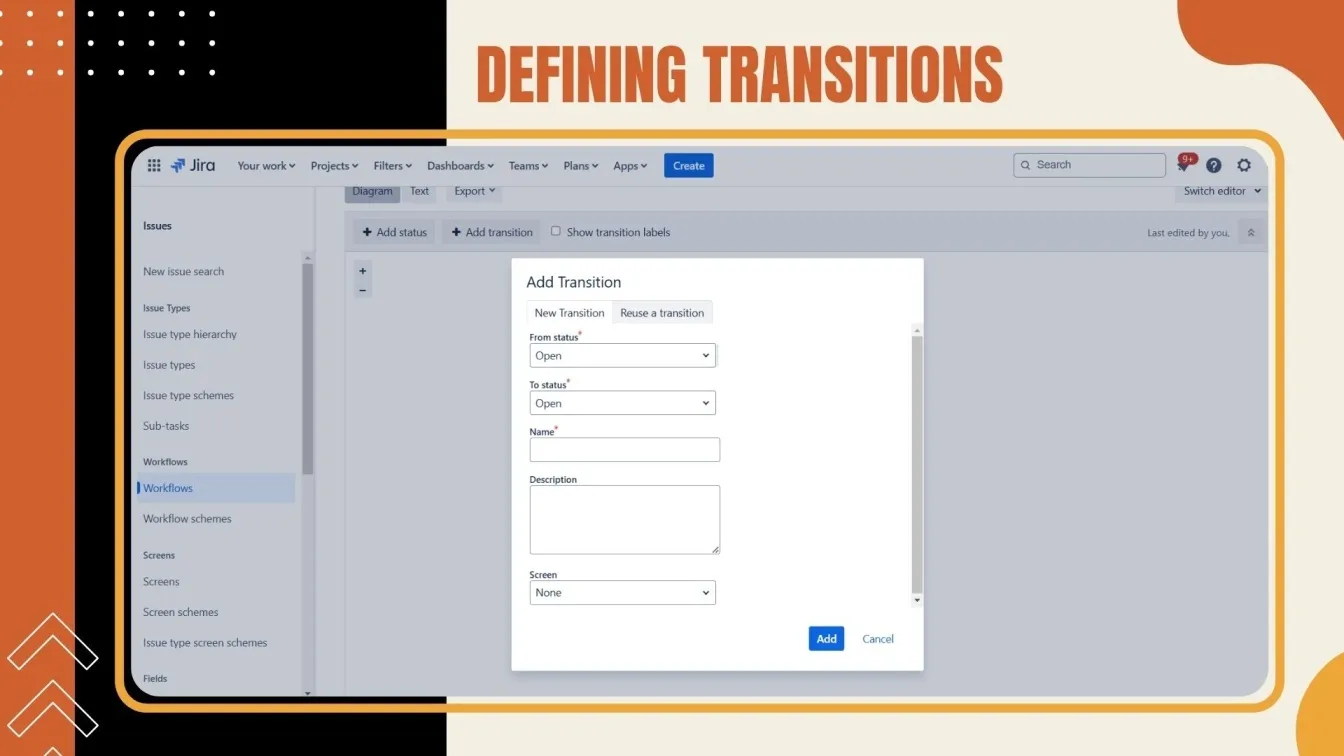
- Defining Transitions:
- Transitions connect statuses, enabling task progression.
- Name transitions clearly, e.g., “Start Progress” or “Request Approval.”
- Use the visual editor to map out the flow between statuses.
- Saving and Publishing the Workflow:
- After finalizing, click Publish Draft to make the workflow live.
- Always save a backup of the current workflow for safety.

- Linking to a Workflow Scheme:
- Associate workflows with specific issue types via workflow schemes.
- For example, use the "Bug Fix Workflow" for "Bug" issue types while assigning another workflow for "Task."
- Assigning to a Project:
- Go to Project Settings > Workflows.
- Select Switch Scheme to apply the workflow scheme to your project.
Why Customize Workflows?
Custom workflows help you tailor Jira to match your team’s processes, ensuring better task tracking, clearer transitions, and improved collaboration.
For a simple workflow for small tasks or a complex one for agile projects, customizing Jira workflows empowers your team to stay organized and productive.
With this guide, you’re ready to build workflows that truly work for your team. Go ahead and give it a try-you’ve got this!
Utilizing the Jira Workflow Editor for Effective Workflow Design
With the Jira Workflow Editor, teams can create and modify workflows to suit their unique project requirements. Here's how to use it to your advantage:
- Access the Workflow Editor: After choosing the workflow you want to modify, go to Settings > Issues > Workflows.
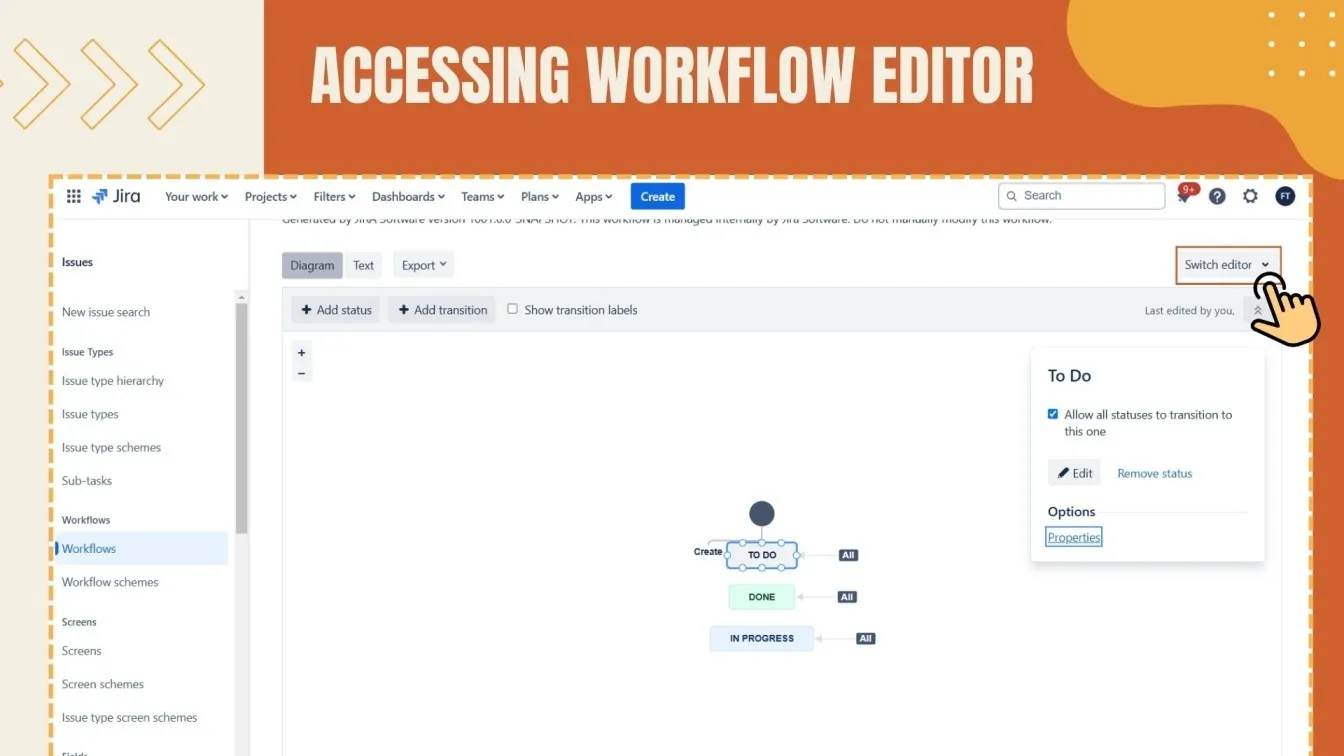
- Add and Modify Statuses: Make sure the statuses you create or alter follow the procedures of your project by using the editor.
- Define Transitions: Create distinct status transitions to show how tasks are progressing.
- Implement Conditions and Validators: Establish validators to make sure the required information is supplied prior to a transfer taking place, and conditions to restrict who is allowed to execute transitions.
- Configure Post Functions: Automate actions that occur after a transition, such as updating fields or sending notifications, to streamline processes.
By effectively utilizing the Jira Workflow Editor, teams can create workflows that enhance efficiency, improve task tracking, and support seamless project management.
Enhancing Workflows with Automation, Behaviors, and Marketplace Apps
To maximize the efficiency of your Jira workflows, integrating automation, custom behaviors, and marketplace apps is key. These tools not only streamline processes but also add flexibility to your workflow design. Let’s see how to enhance your workflows effectively:
- Implement Automation Rules: Utilize Jira's built-in automation to reduce manual tasks. For example, automatically assign issues or update statuses based on specific triggers. This streamlines operations and minimizes errors.
- Define Custom Behaviors: Tailor field behaviors to control user input and enforce data consistency. Custom behaviors ensure that required information is captured accurately, enhancing data integrity.
- Leverage Marketplace Apps: Explore the Atlassian Marketplace for apps that extend Jira's functionality. Tools like JSU Automation Suite and Jira Workflow Toolbox offer advanced workflow capabilities, such as additional conditions, validators, and post functions. These apps enable more complex and customized workflows.
By combining these strategies, you can create smarter, more adaptive workflows that drive productivity and collaboration.
Implementing Workflow Properties, Conditions, Validators, and Post Functions
Properties, conditions, validators, and post functions are strong assets in Jira that allow you to automate procedures, enforce rules, and customize workflows. Task management is made easier with these features, which also let you validate user input and manage transitions. Here's how to set them up, step-by-step:
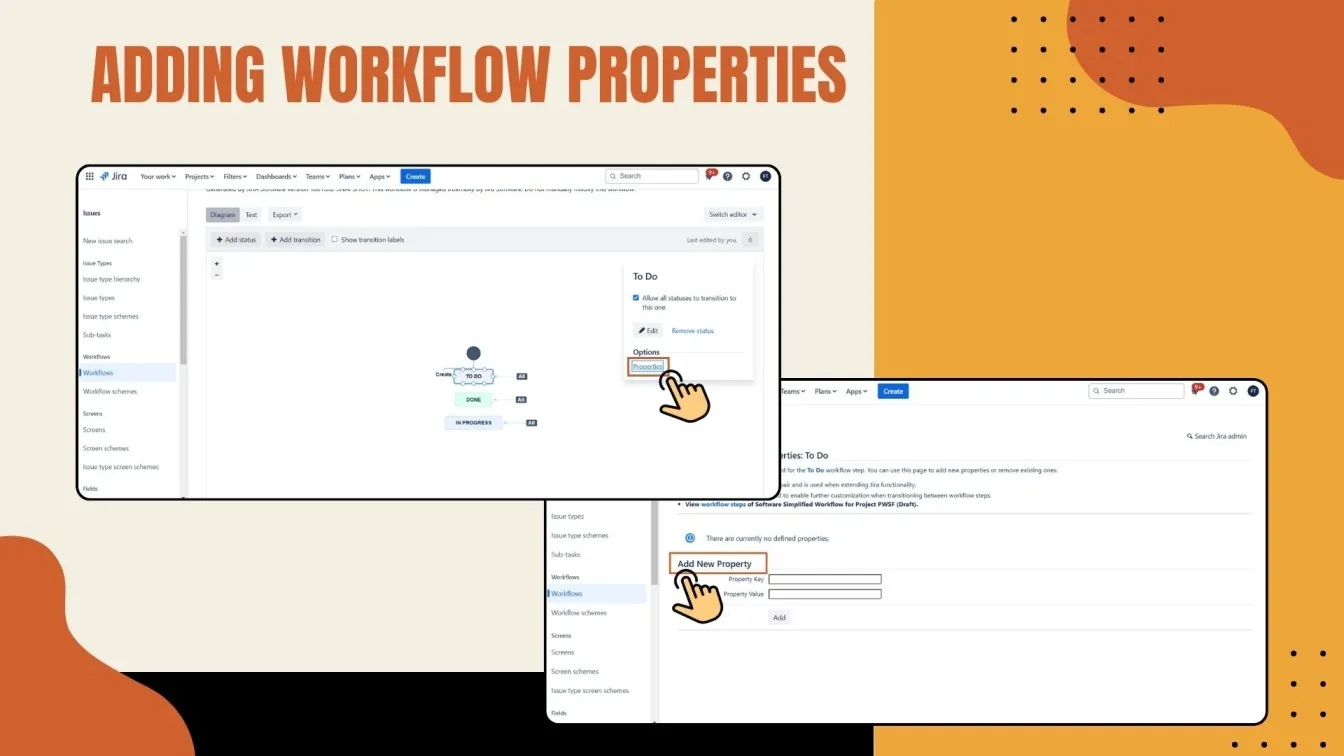
1. Adding Workflow Properties
Workflow properties control behavior for specific statuses.
- Log in as a Jira administrator and navigate to Workflows under Issues.
- Select the workflow to edit and click Edit.
- Click on a specific Status (e.g., "In Progress").
- Go to the Properties tab and add a property key (e.g., jira.permission.edit.group) with its value (e.g., a user group name).
- Save the property to enforce behavior, like restricting edits to certain users.
2. Configuring Conditions
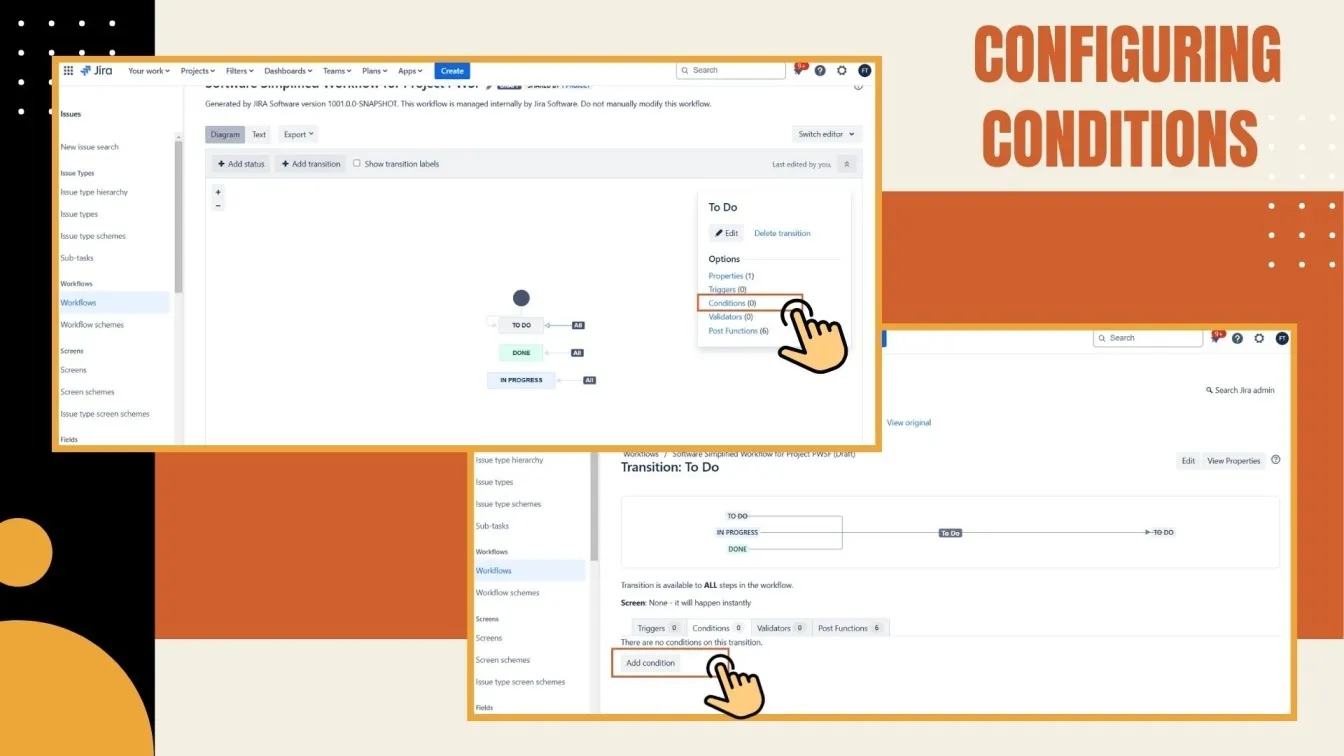
Conditions determine who can perform a transition.
- In the workflow editor, click on the Transition between two statuses.
- Navigate to the Conditions tab.
- Click Add Condition and choose one (e.g., "User Is in Group").
- Configure the parameters, such as the allowed user group.
- Save the condition to control transition permissions.
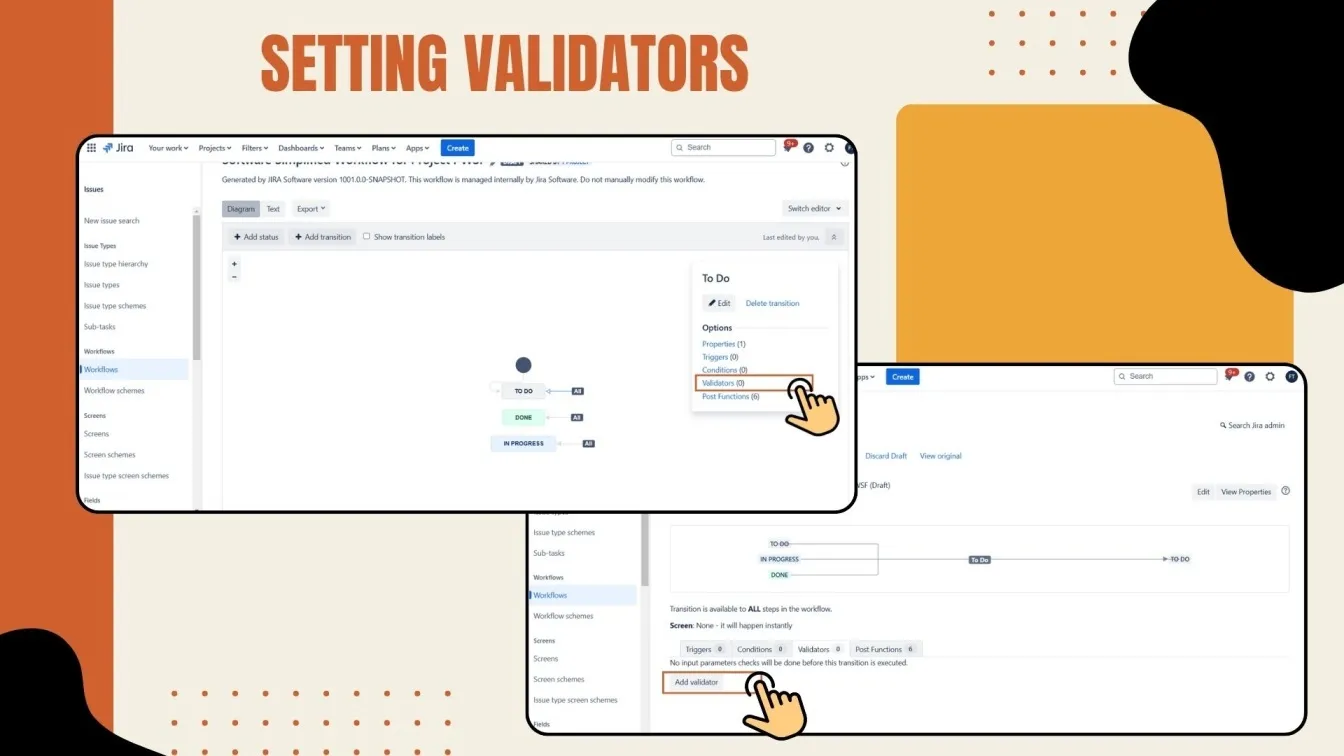
3. Setting Up Validators
Validators ensure that transitions meet specific criteria.
- Open the Transition and go to the Validators tab.
- Click Add Validator and select one (e.g., "Field Required Validator").
- Specify fields that must be completed (e.g., "Summary" or "Assignee").
- Save the validator to ensure transitions follow the rules.
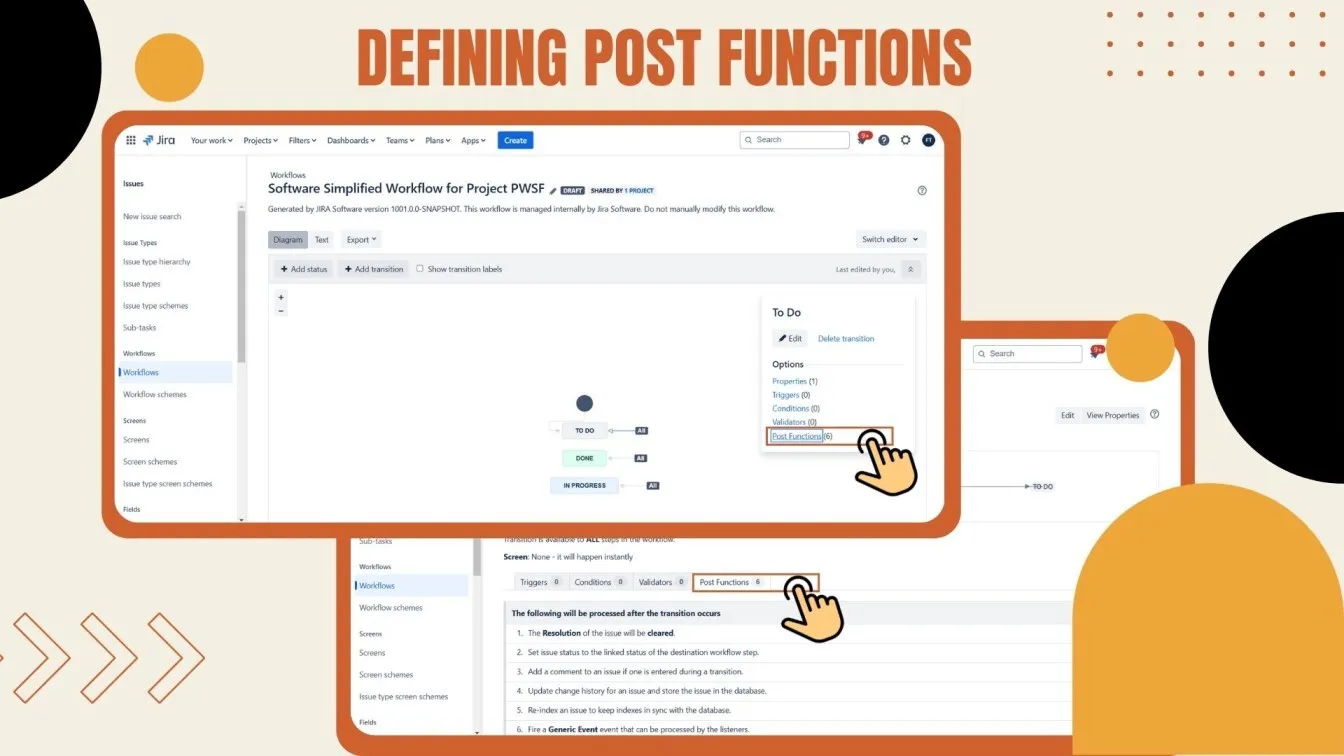
4. Defining Post Functions
Post functions automate actions after a transition.
- In the workflow editor, go to the Post Functions tab within the Transition.
- Click Add Post Function and choose a function (e.g., "Update Issue Field").
- Set parameters, such as the field to update or notification recipients.
- Save the post function to execute actions automatically after the transition.
Integrating Jira Workflows with Development Tools for Seamless Operations
Collaboration and project management can be greatly improved by integrating Jira workflows with development tools like GitHub, Bitbucket, or Jenkins. Through these integrations, teams can monitor code changes, automate procedures, and directly connect development tasks to Jira issues.

For example, connecting Jira with GitHub enables automatic updates to issues when code is committed, merged, or deployed. Similarly, integrating with Jenkins allows build statuses to be reflected in Jira workflows, giving visibility into deployment pipelines. Bitbucket users can link pull requests to Jira issues, ensuring a cohesive workflow from development to release.
To set up these integrations, use Jira's built-in development panel or apps from the Atlassian Marketplace. By aligning workflows with development tools, teams can improve transparency, reduce manual updates, and ensure smoother operations across all stages of the development lifecycle.
Common Challenges in Jira Workflows and How to Overcome Them
Although Jira workflows are effective project management tools, improper design and upkeep can cause problems. Resolving these problems guarantees more efficient operations and enhanced teamwork. The following are typical problems and their fixes:
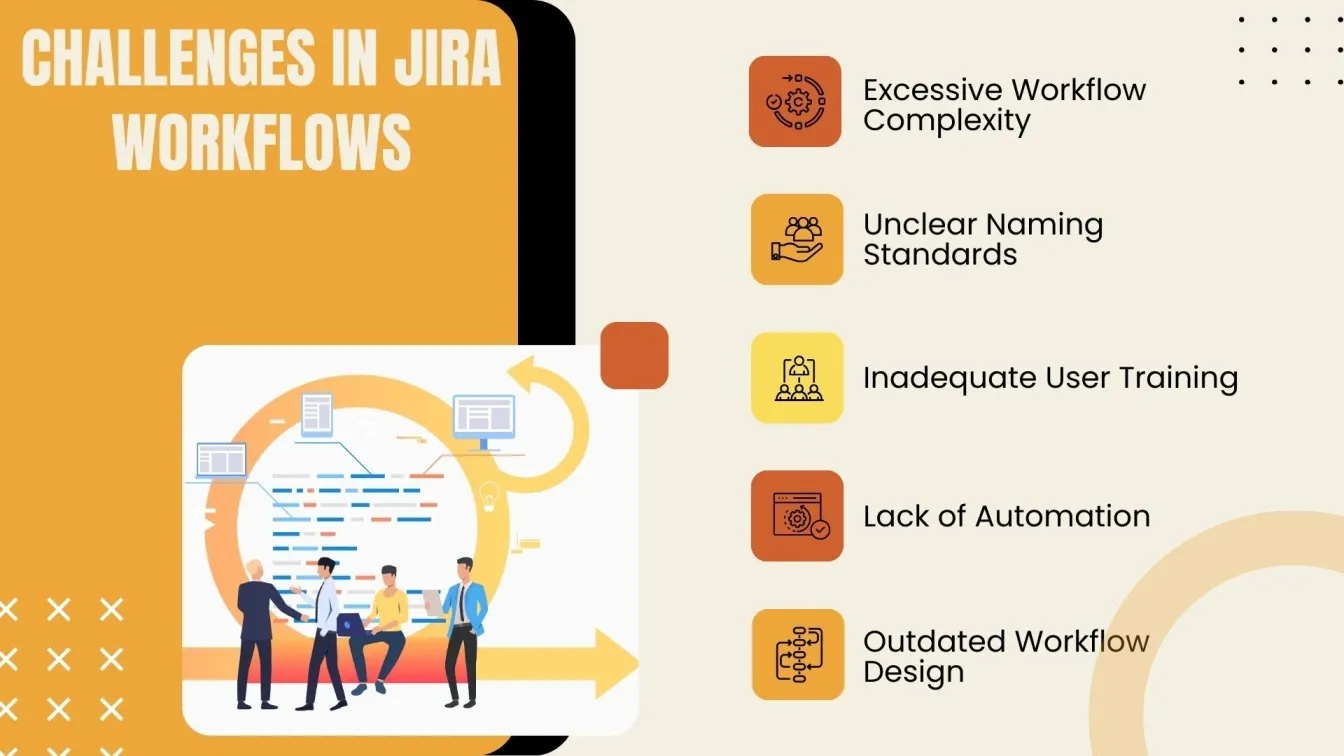
- Overcomplicated Workflows: Too many statuses and transitions can confuse teams.
- Solution: Simplify workflows by focusing on essential steps and removing unnecessary complexity.
- Inconsistent Naming Conventions: Vague or varied names can lead to miscommunication.
- Solution: Use clear, standardized naming conventions for statuses and transitions.
- Lack of User Training: Teams may struggle to use workflows effectively without proper guidance.
- Solution: Provide regular training and documentation for workflow best practices.
- Insufficient Automation: Manual processes slow down efficiency.
- Solution: Implement Jira automation to handle repetitive tasks and improve productivity.
- Outdated Workflows: Static workflows may not meet evolving project needs.
- Solution: Regularly review and update workflows to reflect current team requirements.
Teams can optimize Jira workflows and guarantee smooth project management by tackling these issues.
Advanced Tips for Mastering Jira's Workflow Capabilities
Maximizing Jira's workflow capabilities can significantly improve task management and team efficiency. Here are advanced tips to elevate your workflows:
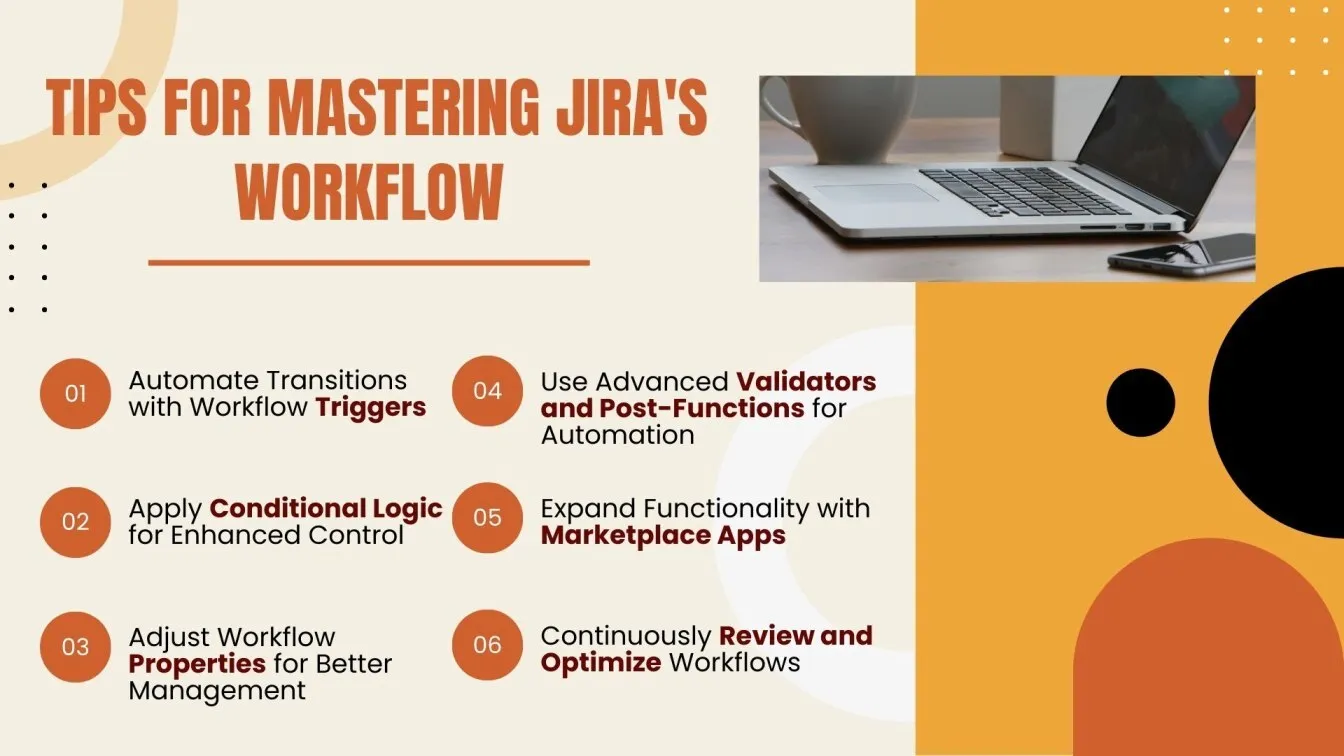
- Utilize Workflow Triggers: Automate transitions by linking workflows to external events, such as commits in GitHub or builds in Jenkins, ensuring real-time updates without manual intervention.
- Incorporate Conditional Logic: Use conditions to control who can execute transitions and under what circumstances, adding precision and preventing unauthorized changes.
- Leverage Workflow Properties: Fine-tune workflow behaviors by setting properties like restricting issue editing at specific stages, ensuring better control over tasks.
- Implement Advanced Validators and Post Functions: Use validators to enforce data integrity and post functions to automate updates, notifications, or integrations after a transition.
- Integrate with Marketplace Apps: Extend Jira’s functionality with apps like JSU Automation Suite or Jira Workflow Toolbox for more complex workflows.
- Regularly Optimize Workflows: Review workflows periodically to ensure they align with evolving team and project needs.
Before we close!
Mastering Jira workflows is essential for project managers aiming to streamline processes and drive project success. With default workflows, customizing workflow diagrams, and incorporating post-functions, teams can unlock Jira’s powerful features for task automation and clarity. For managing user stories in software development or handling complex workflows with continuous integration, Jira provides valuable insights and visual representations to keep projects on track. With its standard workflows and straightforward workflow customization options, Jira empowers the entire team to stay aligned and productive. By optimizing issue fields and enhancing the platform’s project management capabilities, project managers can foster collaboration and efficiency. Jira is truly a powerful tool for delivering seamless project management and achieving business goals.
People Also Ask
👉What are the three types in a Jira workflow?
Statuses, transitions, and resolutions are the three key types in a Jira workflow.
👉What is the default Jira workflow?
The default Jira workflow includes statuses like "To Do," "In Progress," and "Done" without conditions or customizations.
👉What is bug life cycle in Jira?
The bug life cycle in Jira typically includes statuses like "Open," "In Progress," "Fixed," "Reopened," and "Closed."
👉What are the 3 basic components of workflow?
The 3 basic components of a workflow are statuses, transitions, and workflow rules (conditions, validators, and post-functions).
👉What is Definition of Done in Jira workflow?
The Definition of Done in a Jira workflow signifies that all acceptance criteria are met, and the issue is complete, moving to a "Done" status.



%201.webp)
