

Is your project still using JUnit 4? It’s time to upgrade! JUnit 5 migration is a game-changer for integration testing in Java, offering a modern, modular, and flexible testing framework for Java. With JUnit Jupiter, JUnit Vintage, and the JUnit Platform, JUnit 5 delivers better performance, improved annotations, and advanced testing scenarios.
Whether you're working with JUnit test classes, Maven integration tests, Gradle integration tests, or Spring Boot, JUnit 5 provides parallel execution, nested tests, and dependency injection in Java, making it the best unit testing framework for Java.

JUnit 5 vs. JUnit 4: Key Differences Every Developer Should Know
JUnit 4 has been a reliable unit testing framework for Java, but as applications grow, testing needs have evolved. JUnit 5 introduces a modular architecture, improved JUnit annotations, and better JUnit setup for modern Java testing frameworks. With JUnit Jupiter, JUnit Vintage, and the JUnit Platform, developers can write flexible, scalable, and efficient tests.
From JUnit test classes to JUnit parameterized tests, JUnit 5 supports JUnit 5 ignore test options, JUnit tags, and nested tests for better test organization. Need structured test execution? Check out JUnit 5 tutorial, JUnit 5 example, and official JUnit documentation to explore JUnit 5 ignore, JUnit5 ignore, and parameterized test JUnit 5 techniques.
✅ What is JUnit Jupiter? It’s the foundation of JUnit 5, providing advanced test execution in Jupiter Java for seamless integration.
🔥 Why read this blog to upgrade from JUnit 4 to JUnit 5?
📌 JUnit 5 annotations example: New lifecycle methods like @BeforeEach, @Nested, and @Tag optimize test execution.
📌 Better dependency injection Java support: Integrates seamlessly with Mockito and Java dependency injection frameworks.
📌 Dynamic Tests & Parameterized Testing: Use lambda expressions, random values, and CSV files for flexible test inputs.
📌 Improved Assertions & Custom Extensions: Supports third-party assertion libraries and custom JUnit 5 extensions.
📌 Maven Continuous Integration & Gradle Integration Testing: Ensures smooth repeatable builds and efficient test execution time.
With enhanced JUnit tags and filtering, JUnit 5 ignore test options, and parallel execution, JUnit 5 is the ultimate automation testing framework for Java.
✅ Ready to unlock JUnit 5’s advanced features? Let’s dive in!
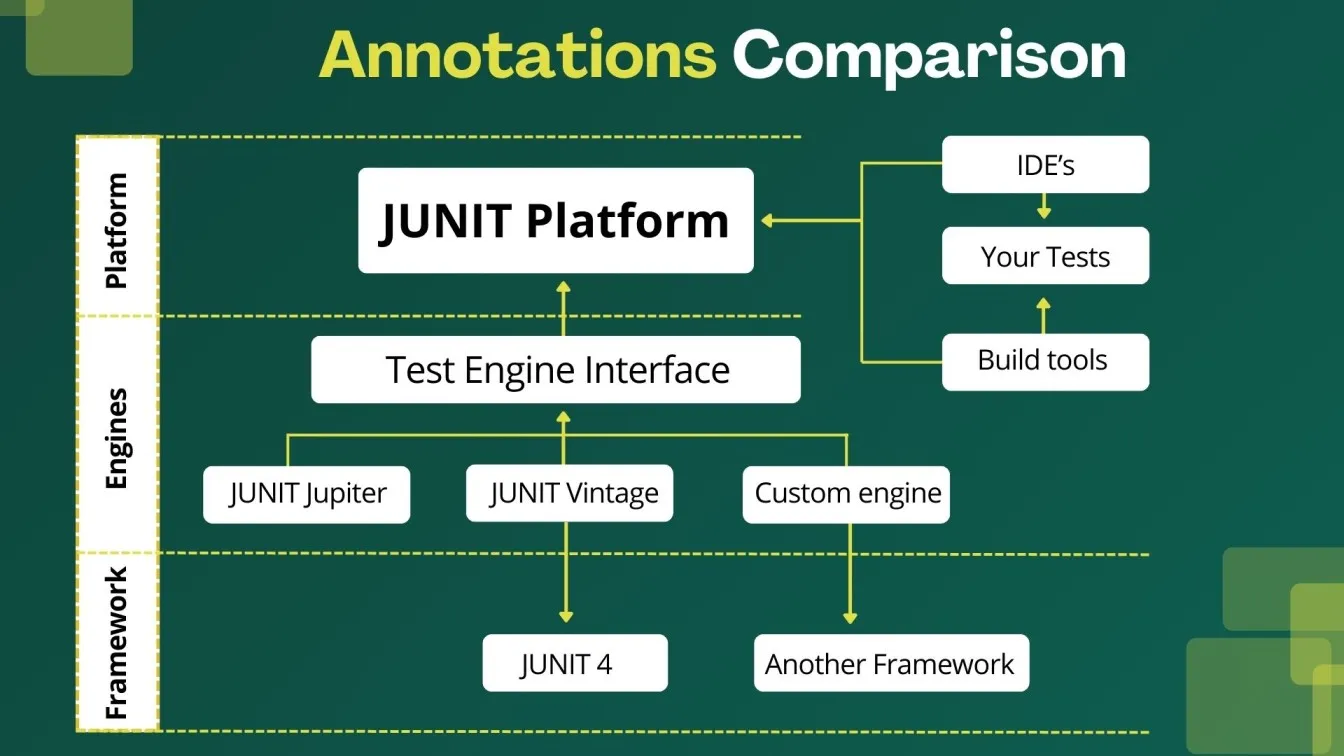
Understanding JUnit 5 Architecture: Modular and Flexible
JUnit 5 revolutionizes integration testing in Java with its modular architecture, making it the best unit testing framework for Java. Unlike JUnit 4, which was monolithic, JUnit 5 is divided into:
✅ JUnit Platform – Provides a foundation for running tests across multiple testing frameworks, supporting JUnit 4 to JUnit 5 migration.
✅ JUnit Jupiter – Introduces modern JUnit 5 annotations, nested tests in JUnit 5, and Dynamic Tests for flexible test cases.
✅ JUnit Vintage – Ensures backward compatibility, allowing execution of JUnit 4 tests within JUnit
🔥 Why JUnit 5’s Modular Design Matters
- Better test lifecycle management with @BeforeEach, @Nested, and @Tag annotations.
- Parallel execution enhances performance testing in Java, reducing execution time.
- Maven integration tests & Gradle integration tests ensure smooth repeatable builds.
- Advanced dependency injection in Java supports mock objects with Mockito.
- Custom extension model enables custom annotations, custom conditions, and improved assertion methods.
With built-in support for Spring Boot, Java 8, and Java dependency injection frameworks, JUnit 5 is the ultimate automation testing framework for Java.
JUnit 5 in Action: How to Write and Execute Java Tests Effectively
JUnit 5 is the best unit testing framework for Java, enhancing integration testing with advanced annotations, nested tests, and parameterized testing. It simplifies test execution in Maven, Gradle, and Spring Boot with better assertions, Java dependency injection, and parallel execution.
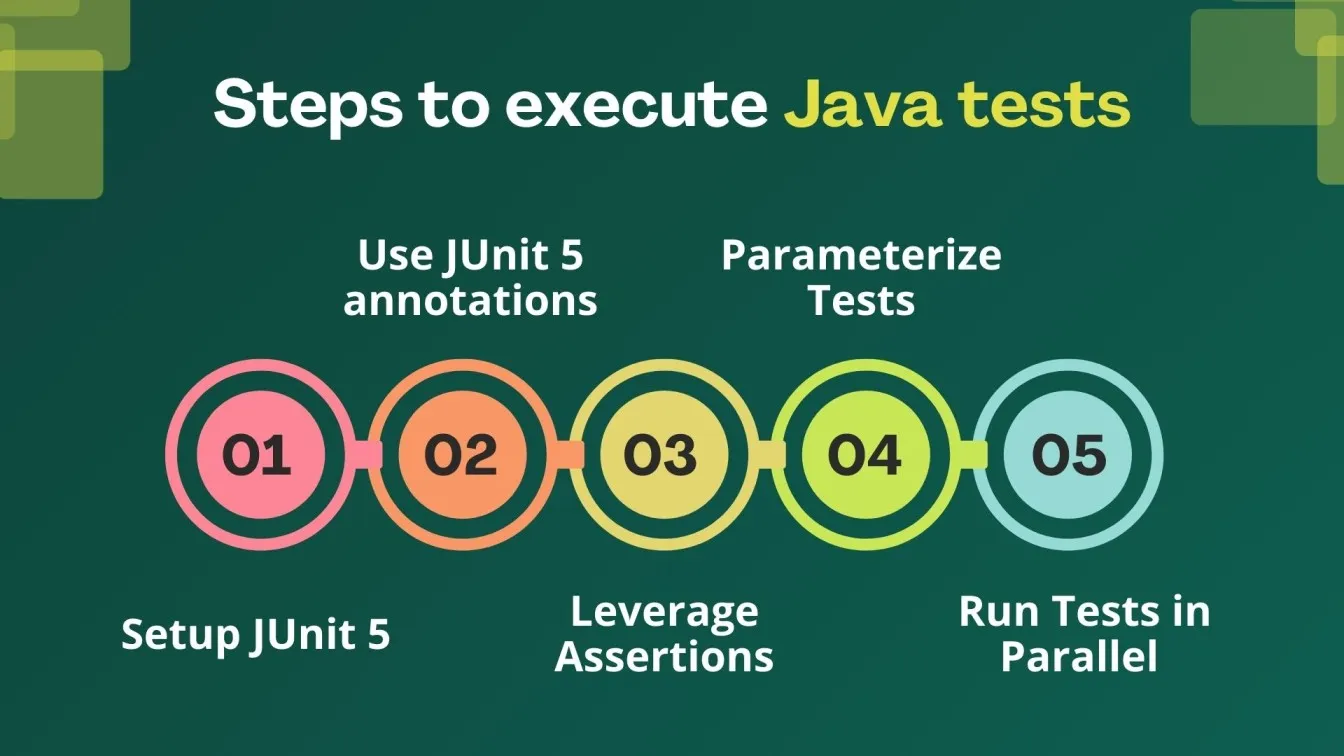
Writing JUnit 5 Tests: Step-by-Step
1️⃣ Setup JUnit 5 – Add junit-jupiter dependency for Maven continuous integration or Gradle integration testing.
2️⃣ Use JUnit 5 annotations like– @Test, @BeforeEach, @AfterEach, @Nested, @Tag, and more.
3️⃣ Leverage Assertions – Use assertAll(), assertThrows(), and third-party assertion libraries for better validation.
4️⃣ Parameterize Tests – Use @ValueSource, @CsvSource, and @MethodSource to handle input values dynamically.
5️⃣ Run Tests in Parallel – Optimize performance testing in Java with parallel execution.
✅ Executing JUnit 5 Tests
- Maven integration testing – Run mvn test for seamless repeatable builds.
- Gradle integration test – Execute tests with gradle test command.
- Spring Boot integration – Use @SpringBootTest to run JUnit 5 tests in a Spring Boot environment.
With JUnit 5 migration, Java dependency injection frameworks, and custom extension models, testing becomes more efficient and maintainable. JUnit 5 is the go-to automation testing framework for Java!
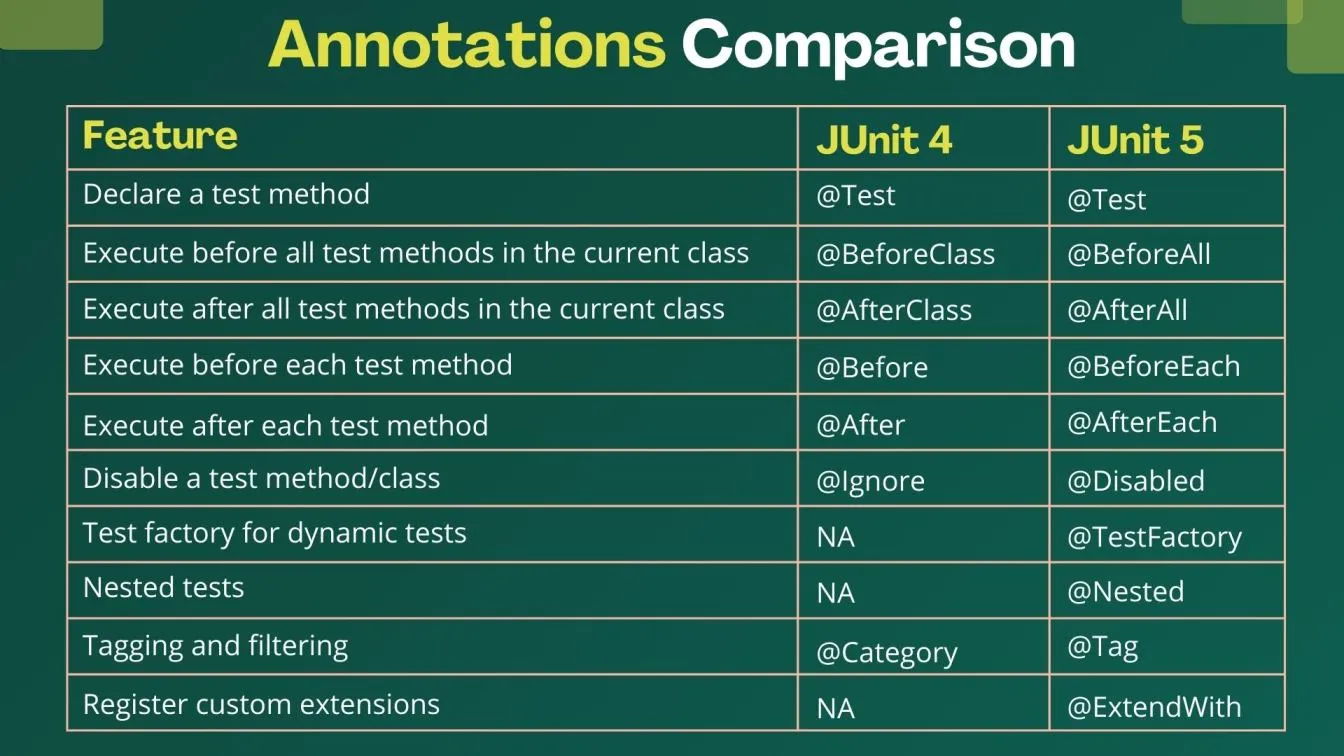
JUnit 5 Annotations Explained: A Developer’s Cheat Sheet
JUnit 5 annotations play a crucial role in making JUnit 5 the best unit testing framework for Java. Whether you're performing integration testing in Java, writing JUnit nested tests, or handling dependency injection in Java, these annotations streamline the testing process.
Key JUnit 5 Annotations:
✅ Basic Test Annotations
- @Test – Defines a single test method in JUnit Jupiter.
- @RepeatedTest – Runs a test multiple times, ideal for performance testing in Java.
- @ParameterizedTest – Supports Dynamic Tests and parameterized testing, reducing test duplication.
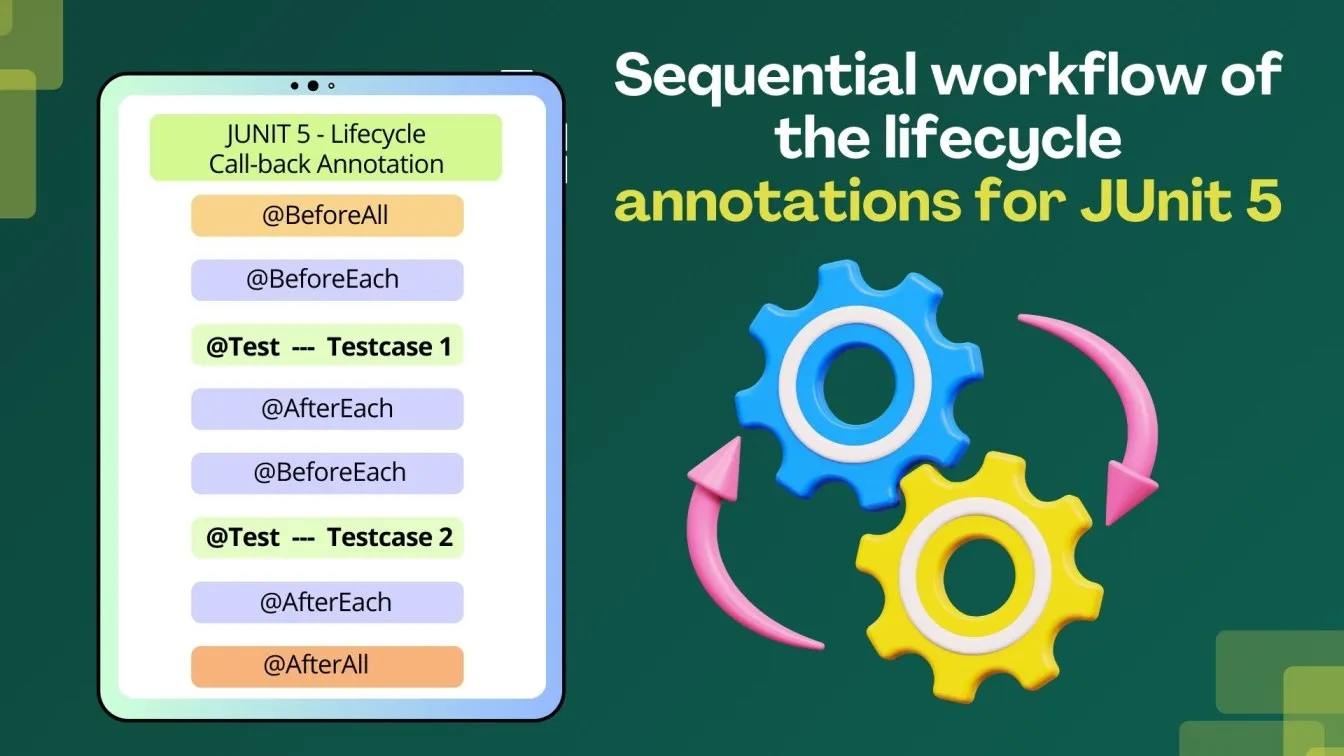
✅ Test Lifecycle Annotations
- @BeforeEach / @AfterEach – Executes setup code before/after every test.
- @BeforeAll / @AfterAll – Runs once at the class level, improving test execution time.
- @Disabled – Skips tests without removing them from the JUnit framework.
✅ Advanced JUnit 5 Annotations
- @Nested – Enables nested tests in JUnit 5, a major improvement over JUnit 4 nested tests.
- @Tag – Useful for JUnit 5 tags and filtering, allowing selective test execution.
- @DisplayName – Assigns custom display names to test methods.
- @ExtendWith – Supports custom extension models like Mockito for handling mock objects.
📌 JUnit 5 Annotations Example: JUnit 5 Integration with Build Tools
- Maven integration test → Add junit-jupiter to pom.xml.
- Gradle integration test → Use testImplementation 'org.junit.jupiter:junit-jupiter.
import org.junit.jupiter.api.*;

class TestExample {
    @BeforeEach
    void setup() { System.out.println("Before each test"); }

    @Test
    @DisplayName("Addition Test")
    void testAddition() { Assertions.assertEquals(4, 2 + 2); }
}- Maven continuous integration → Automate test execution in CI/CD pipelines.
Why JUnit 5 Annotations Matter?
- Improve Java code quality tools and maintainable tests.
- Enable parallel execution and testing frameworks flexibility.
- Optimize automation testing framework for Java.
With JUnit 5 migration, JUnit 4 vs JUnit 5 annotations, and Java dependency injection frameworks, JUnit 5 is the go-to testing tool for modern Java 8 and Java 16 projects!
Assertions in JUnit 5: Writing Clear and Effective Test Cases
Assertions in JUnit 5 are crucial for verifying test outcomes in Java's best unit testing framework. JUnit Jupiter's improved assertion library enhances readability, aiding integration, performance, and automation testing in Java.
Key Assertion Methods in JUnit 5
Basic Assertions:
✔️ assertEquals(expected, actual) – Verifies two values are equal.
✔️ assertNotEquals(unexpected, actual) – Ensures values are different.
✔️ assertTrue(condition) / assertFalse(condition) – Checks Boolean expressions.
Advanced Assertions:
✔️ assertAll() – Groups multiple assertions in one test.
✔️ assertThrows() – Validates expected exceptions, aiding dependency injection Java error handling.
✔️ assertTimeout() – Ensures optimal execution time for performance testing in Java.
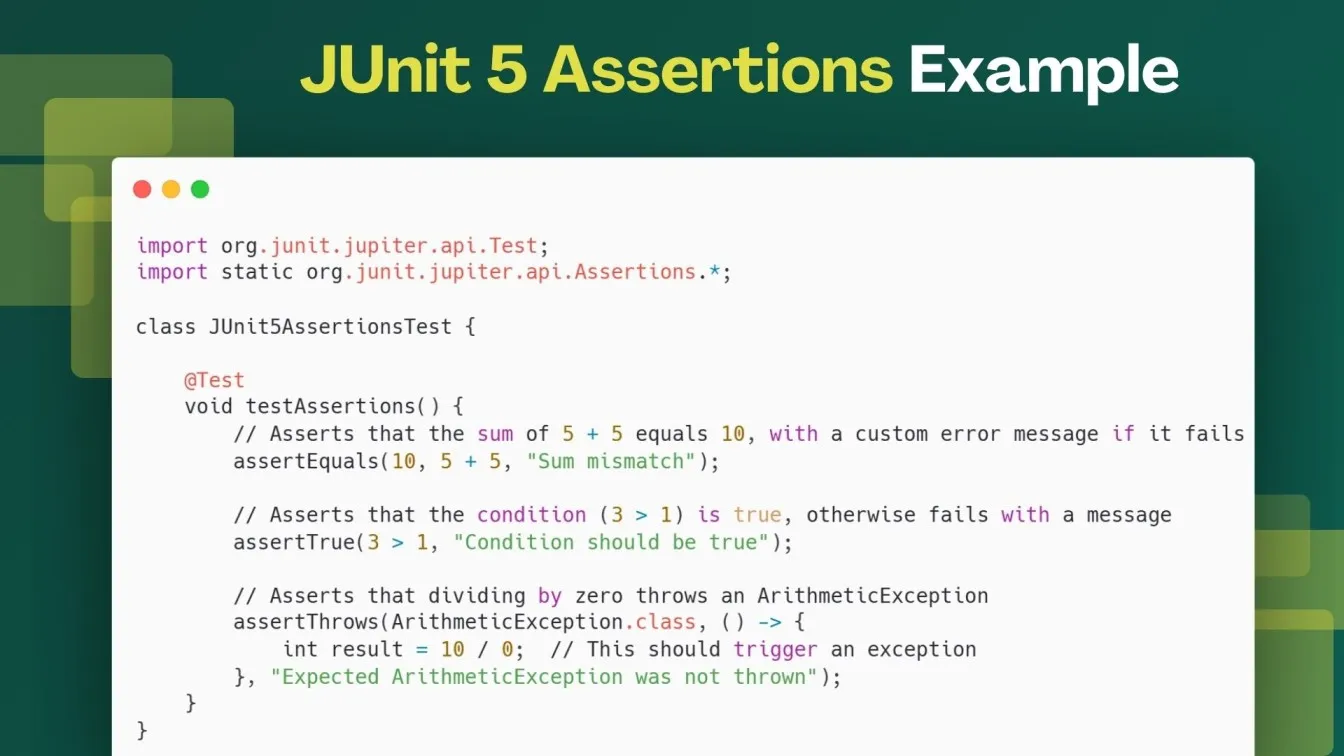
Why JUnit 5 Assertions Matter?
- Ensures test accuracy, improving code quality tools Java.
- Simplifies JUnit 5 migration with better validation.
- Supports Maven and Gradle integration tests with reliable assertions.
- Enhances integration tests and JUnit nested tests for structured testing.
With JUnit 4 to JUnit 5 migration, nested tests in JUnit 5, and custom display names, developers can write cleaner, more efficient test cases!.
Parameterized Tests in JUnit 5: Reduce Code Duplication
JUnit 5 Parameterized Tests reduce repetitive code, enhance code quality tools for Java, and improve test maintainability. Using @ParameterizedTest, we can run multiple inputs without separate test methods.
Why Use Parameterized Tests?
- Eliminates code duplication
- Improves automation testing framework for Java
- Enhances integration testing in Java
- Supports Maven and Gradle integration tests
Problem: This approach leads to code duplication, making the test suite harder to maintain and scale.
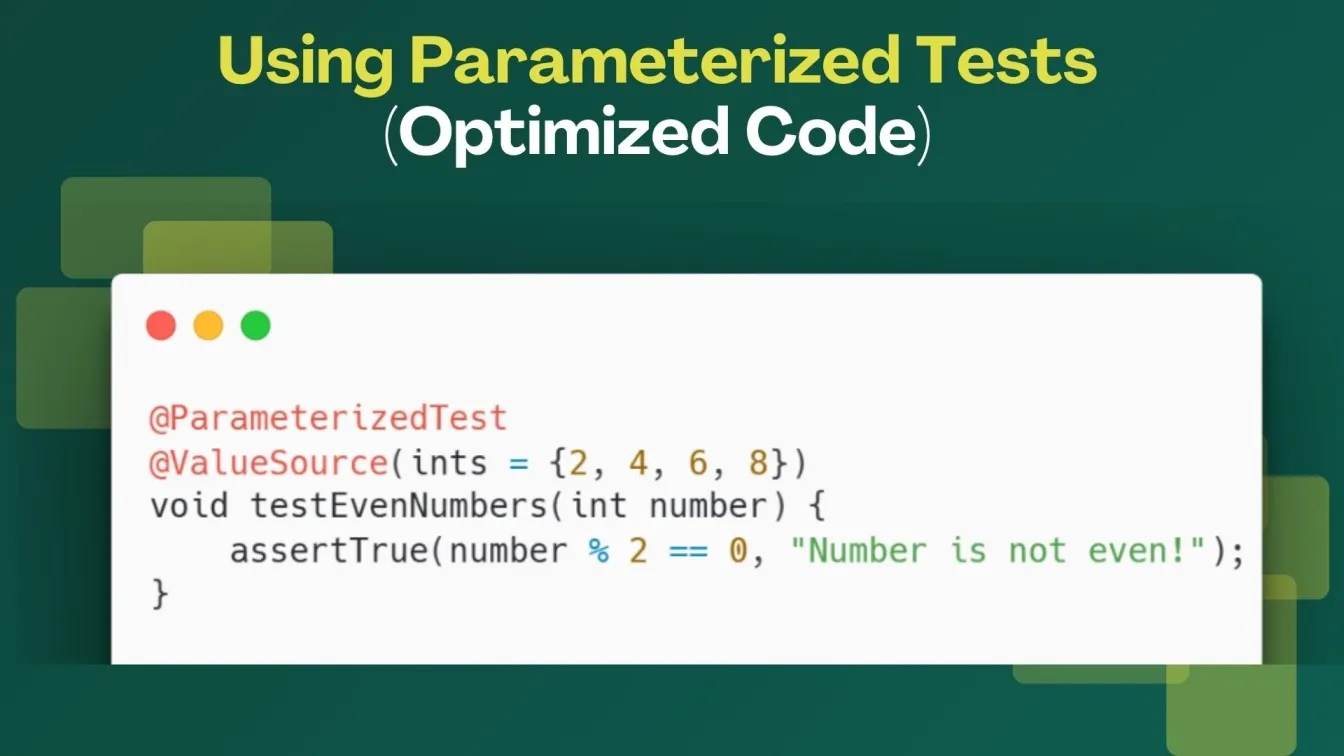
- Uses @ParameterizedTest with @ValueSource to check even numbers.
- Reduces redundant test cases, improving Java code quality tools.
By leveraging JUnit 5 Parameterized Tests, developers can avoid unnecessary repetition, improve Java code quality tools, and ensure efficient integration testing in Java. This approach is crucial for maintaining clean, scalable, and well-structured test suites.
Nested Tests in JUnit 5: Structuring Test Cases the Right Way
JUnit 5 Nested Tests provide a structured way to group related test cases, improving test organization, readability, and maintainability. Using nested classes, we can create logical groupings for different test scenarios within a single test class.
Why Use Nested Tests?
- Groups related tests – Keeps test cases structured.
- Improves readability – Each feature (Addition, Subtraction) has its own section.
- Reduces duplicate setup code – Outer class setup applies to all inner tests.
Using nested tests in JUnit 5 ensures better test maintainability and cleaner code!
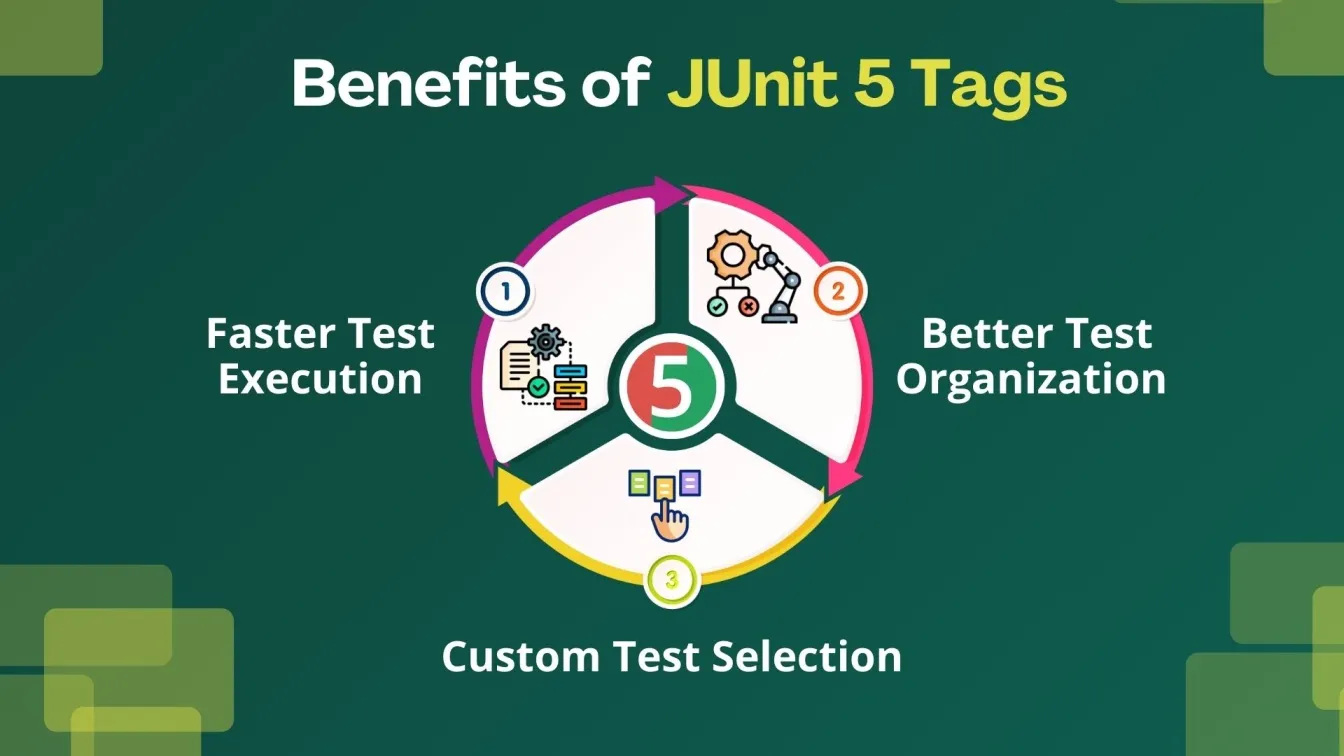
JUnit 5 Tags and Filtering: Running Only What You Need
JUnit 5 allows developers to categorize and filter test execution using tags, making it easier to run only relevant test cases. This feature is useful in maven integration tests, gradle integration tests, and automation testing frameworks for Java.
How to Use JUnit 5 Tags?
You can assign a tag to a test using the @Tag annotation:
import org.junit.jupiter.api.Tag;
import org.junit.jupiter.api.Test;
import static org.junit.jupiter.api.Assertions.*;

class TagExampleTest {

    @Test
    @Tag("fast")
    void fastTest() {
        // A quick-running test
        assertEquals(2, 1 + 1, "Fast test failed");
    }

    @Test
    @Tag("slow")
    void slowTest() {
        // A time-consuming test
        assertEquals(100, 50 * 2, "Slow test failed");
    }
}
Filtering Tests with Tags
You can run tests selectively using Maven or Gradle:
✅ Maven:
<plugin>
    <artifactId>maven-surefire-plugin</artifactId>
    <configuration>
        <groups>fast</groups> <!-- Runs only tests tagged as 'fast' -->
    </configuration>
</plugin>
✅ Gradle:
test {
    useJUnitPlatform {
        includeTags 'fast' // Runs only 'fast' tests
    }
}
Why Use JUnit 5 Tags?
- Faster Test Execution – Run only necessary tests, boosting efficiency in Maven continuous integration.
- Better Test Organization – Categorize tests (unit, integration, performance) for better management.
- Custom Test Selection – Easily filter tests during JUnit 4 to JUnit 5 migration.
How Filtering Works?
- In Maven integration testing, include/exclude tagged tests in build configurations.
- In Gradle integration tests, tags enable selective execution for better test management.
- Helps in performance testing in Java, separating slow and fast tests.
Using JUnit 5 tags and filtering optimizes test execution, making it the best unit testing framework for Java!
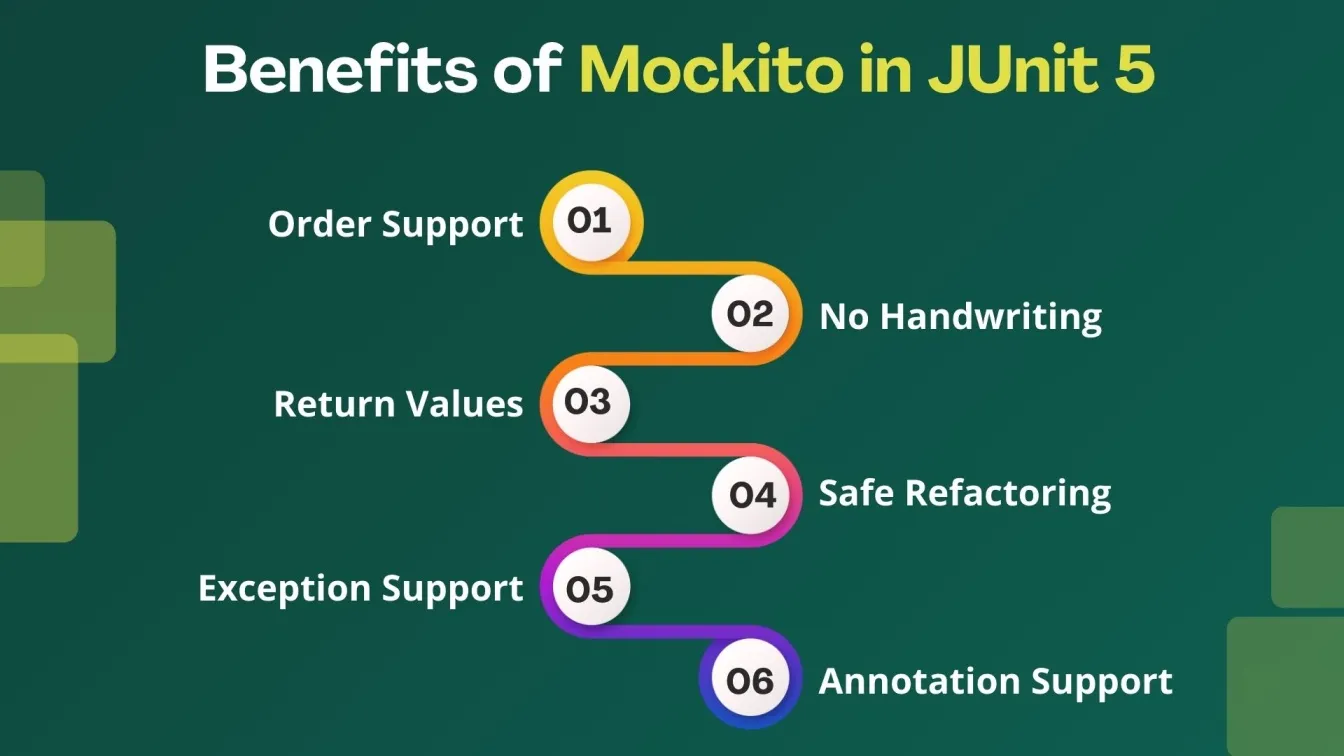
JUnit 5 and Mockito: How to Mock Dependencies Efficiently
Mocking dependencies in JUnit 5 with Mockito enhances test reliability, a key part of unit testing frameworks for Java. Mock objects help isolate components, ensuring efficient integration testing in Java.
Why Use Mockito for JUnit 5?
- Decouples test logic from actual implementations.
- Improves maintainability by avoiding real database/network calls.
- Speeds up test execution, crucial for Maven and Gradle integration tests.
Best Practices for Mocking Dependencies
- Use @Mock and @InjectMocks for dependency injection in Java.
- Utilize when().thenReturn() to simulate behavior.
- Combine with JUnit 5 annotations like @BeforeEach for setup.
- Avoid over-mocking to maintain code quality tools for Java.
Mockito in JUnit 5 simplifies JUnit 5 migration, ensuring robust and maintainable test cases.
Using Dependency Injection in JUnit 5: Examples and Best Practices
Dependency Injection (DI) in JUnit 5 simplifies test setup, enhancing maintainability and flexibility in unit testing frameworks for Java. With constructor and method parameter injection, managing dependencies becomes easier without manual instantiation.
Why Use Dependency Injection in JUnit 5?
- Reduces boilerplate code by injecting dependencies automatically.
- Improves test isolation, benefiting the automation testing framework for Java.
- Enhances maintainability, especially in Spring Boot and Java dependency injection frameworks.
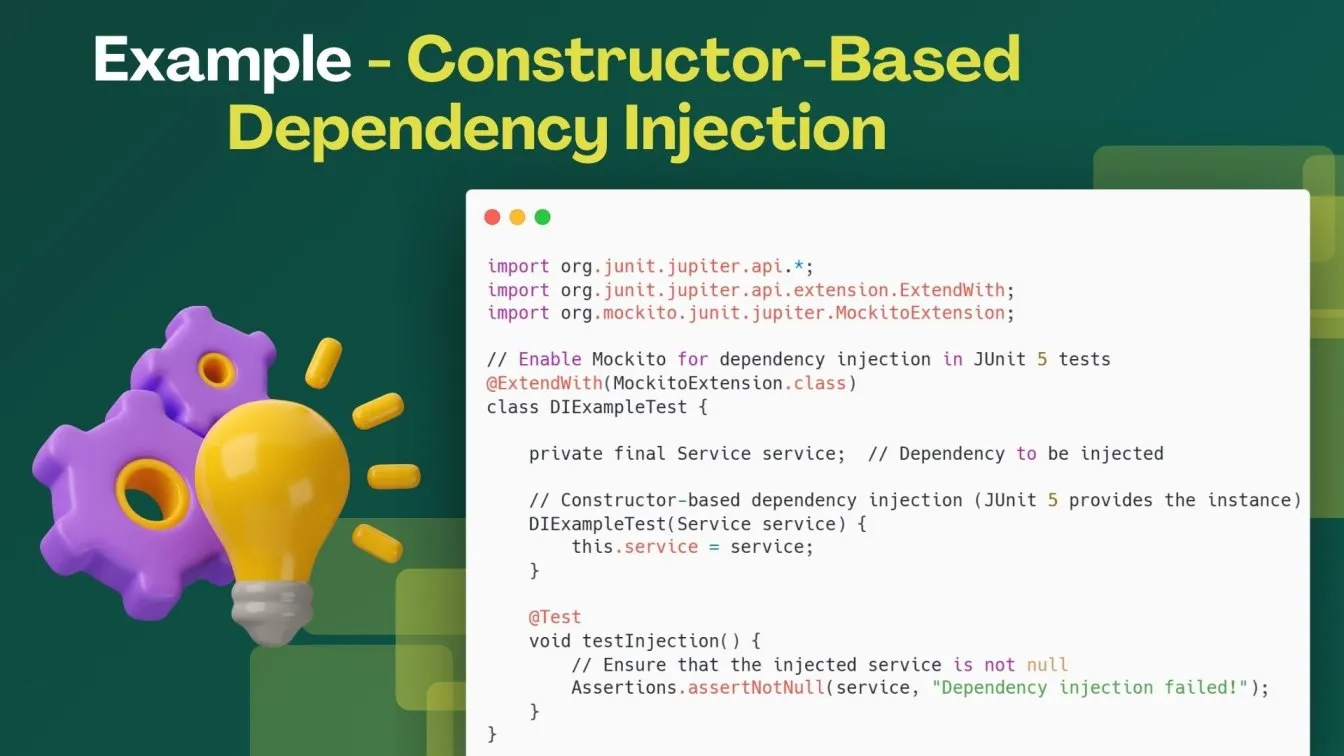
Best Practices for Dependency Injection in JUnit 5
- Use @ExtendWith for seamless integration with Mockito and DI frameworks.
- Prefer constructor injection over field injection for better readability.
- Combine DI with mock objects in Mockito to simulate dependencies.
- Leverage Spring Boot’s @TestConfiguration for real-world testing.
Why This Approach?
- Constructor Injection ensures better test isolation.
- Mocking Support with Mockito simplifies dependency handling.
- Better Maintainability reduces boilerplate and keeps tests clean.
Using dependency injection in Java with JUnit 5 supports Maven and Gradle integration tests, ensuring maintainable test cases.
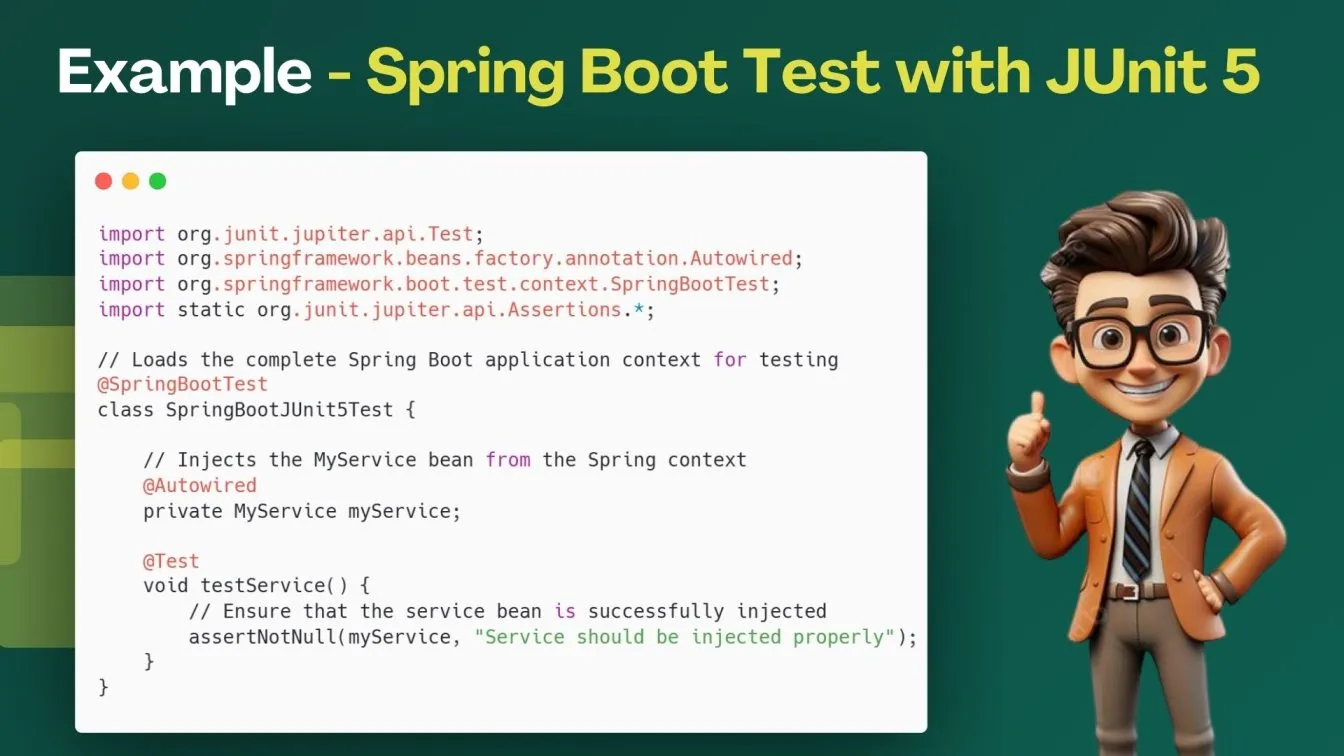
Integrating JUnit 5 with Spring Boot for Enterprise Testing
JUnit 5 + Spring Boot ensures scalability, maintainability, and performance testing in Java applications.
Why Use JUnit 5 with Spring Boot?
- Better Dependency Injection in Java – Uses Spring Boot TestContext for seamless Java dependency injection frameworks.
- Improved Integration Testing in Java – Supports Maven and Gradle integration tests.
- Advanced Testing Features – Enables parallel execution, nested tests, and custom extensions for efficiency.
Setting Up JUnit 5 with Spring Boot
- Add JUnit 5 dependencies in pom.xml (Maven) or build.gradle (Gradle).
- Annotate tests with @SpringBootTest for full application context loading.
- Use @TestConfiguration and @MockBean for dependency injection.
Key Benefits
- Works with Maven continuous integration and Gradle integration tests.
- Enables parallel test execution, speeding up testing cycles.
- Enhances automation testing framework for Java, improving test reliability.
Maven and Gradle Integration with JUnit 5
Integrating JUnit 5 with Maven and Gradle simplifies automation testing in Java while ensuring repeatable builds and continuous integration.
Maven Integration with JUnit 5:
To use JUnit 5 in a Maven project, update the pom.xml file with the following dependencies:
<dependencies>
    <!-- JUnit 5 API and Engine -->
    <dependency>
        <groupId>org.junit.jupiter</groupId>
        <artifactId>junit-jupiter</artifactId>
        <version>5.9.2</version>
        <scope>test</scope>
    </dependency>
</dependencies>
Maven integration tests run using:
mvn testGradle Integration with JUnit 5
For Gradle projects, add this to build.gradle:
dependencies {
    testImplementation 'org.junit.jupiter:junit-jupiter:5.9.2'
}
Gradle integration tests run using:
gradle test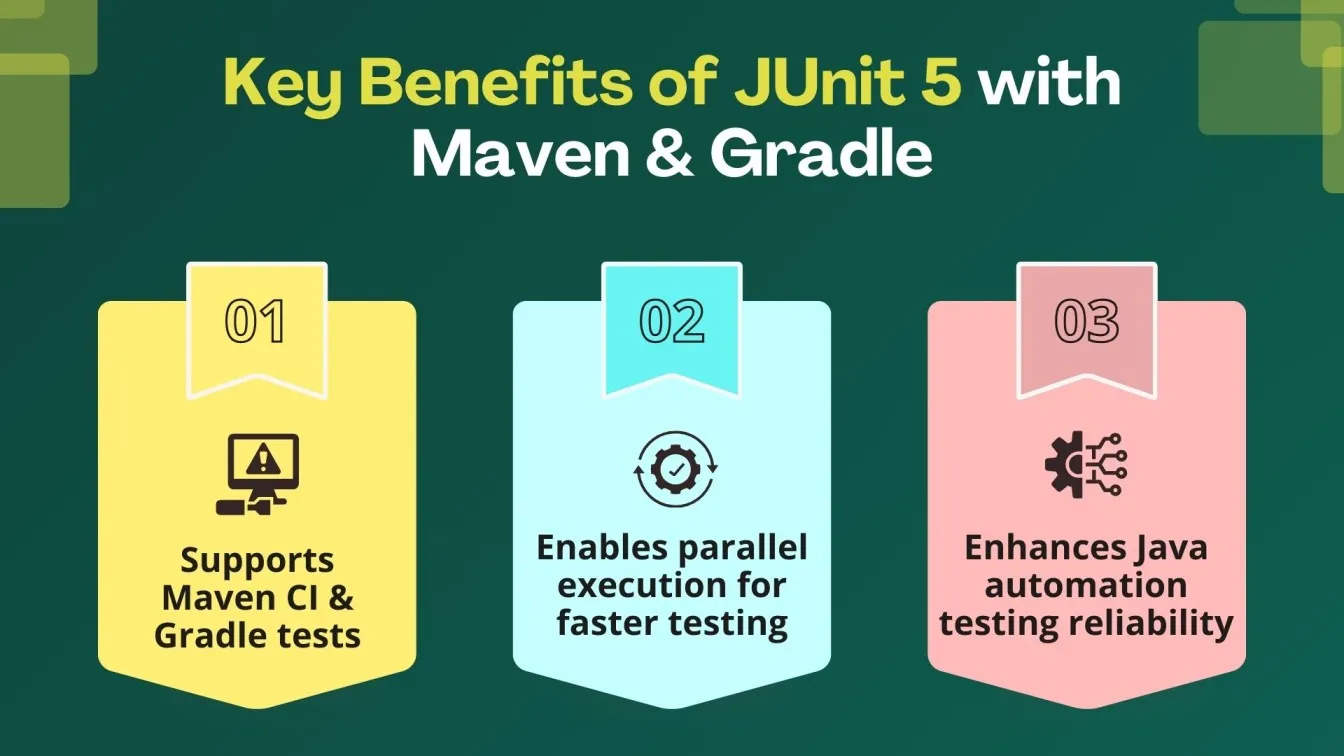
By integrating JUnit 5 with Maven and Gradle, developers can leverage enterprise-level automation testing frameworks for Java with better performance and flexibility.
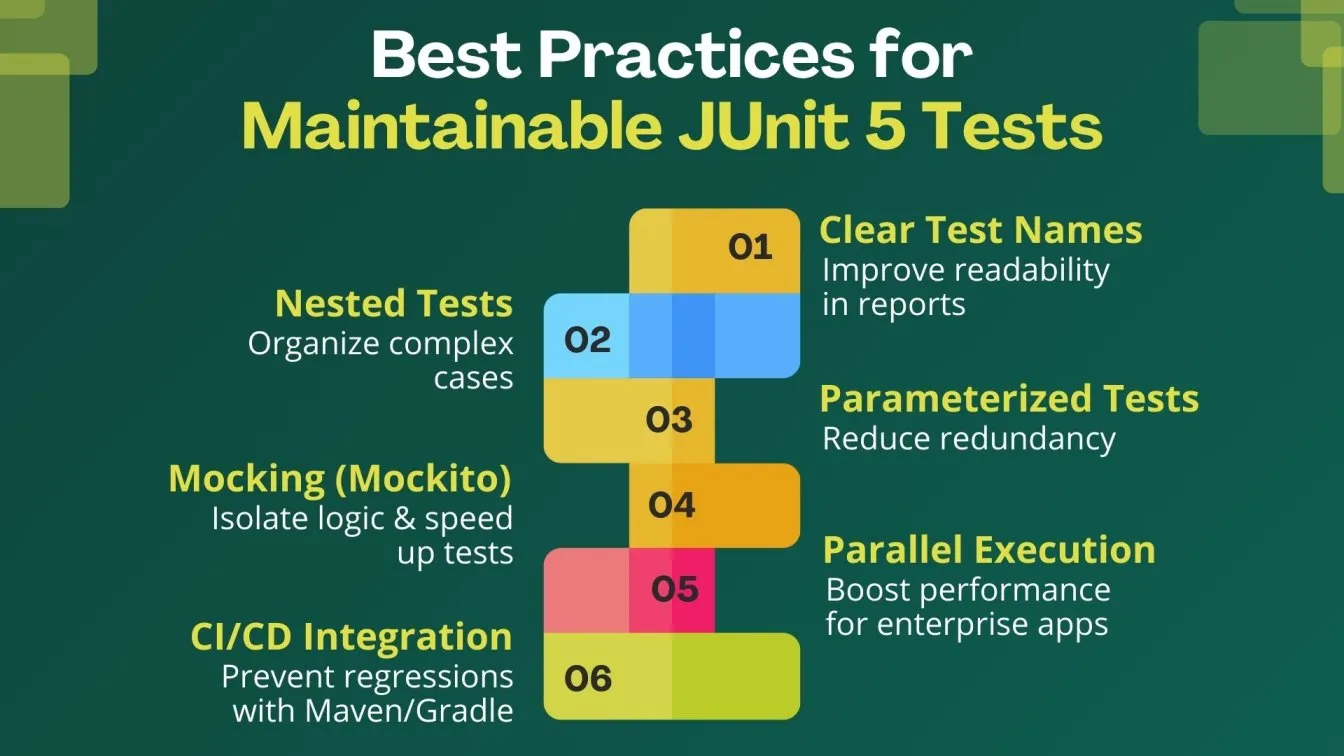
Best Practices for Writing Maintainable JUnit 5 Tests
Want to write clean, scalable, and efficient JUnit 5 tests? Following best practices ensures your tests remain reliable, easy to debug, and future-proof.
By using descriptive test names, you make test reports easier to understand. Nested tests help organize complex test cases, while parameterized tests eliminate redundancy. Instead of relying on real dependencies, mocking with Mockito speeds up execution and isolates test logic.
For enterprise applications, enabling parallel execution in JUnit 5 significantly improves performance. Integrating JUnit 5 with Maven and Gradle ensures continuous testing in CI/CD pipelines, preventing regressions before they reach production.
By implementing these best practices, you can boost test efficiency, improve Java code quality, and streamline development workflows.
Mastering JUnit 5: Top-Level Test Classes, Method-Level Execution, and Custom Assertions
JUnit 5, the major version of the JUnit framework, enhances class execution with top-level classes, Top-level test classes, and a single test class, refining the execution of tests in the current class. It optimizes method-level execution with void testMethod, static methods, and qualified method, improving individual test methods.
With basic annotations, repeatable annotations, and structured setup code, JUnit 5 ensures efficient testing. Custom Sources, including CSV file, object arrays, external classes, and input values, act as a source of arguments, improving data-driven testing. Handling of primitive type, enum type, and precise return types further refines execution.
JUnit 5 effectively sorts test methods and sorts test classes, structuring test sequencing. Outer tests enhance flexibility, supporting experimental features, random values, regular expression matching, and compile time validation.
The display name generator enables descriptive names and custom names, enhanBest Practices for Maintainable JUnit 5 Testscing readability. Advanced assertion methods from Third-party Assertion Libraries generate precise failure messages, error messages, and ensure accurate assertion failure handling.
For backward compatibility, JUnit Vintage supports previous versions, ensuring smooth transitions across JUnit versions. With built-in support for Java 16, JUnit 5 integrates seamlessly with modern testing tools, leveraging key features for structured automation
Summary
JUnit 5, the major version of the JUnit framework, enhances class execution with top-level classes, refining test structures within the current class and multiple test classes. Supporting Java 16, it optimizes method-level execution with void testMethod, static methods, and qualified method, ensuring precise and modular test automation.
With improved handling of input values, external classes, and structured execution, JUnit 5 efficiently sorts test methods and sorts test classes, ensuring organized test suites. Outer tests provide better test isolation, refining execution across the current class and various top-level classes.
JUnit 5 also strengthens assertion validation by refining failure messages, enhancing debugging. Its support for previous versions through JUnit Vintage ensures smooth migration while maintaining test integrity.
As a powerful programming language-driven framework, JUnit 5 maximizes class execution efficiency, utilizing top-level classes, qualified methods, and static methods to structure automated tests. With seamless integration of external classes, advanced assertions, and robust test organization, JUnit 5 remains the go-to testing solution for Java 16 and modern development needs.
What’s Next? Your JUnit 5 Questions Answered!
Got more questions? We've got you covered! Up next, we’ll dive into the most common JUnit 5 FAQs, including how to run tests in Eclipse and IntelliJ IDEA, enable parallel execution for faster performance, understand test execution order, use JUnit 5 for UI testing, and smoothly migrate from JUnit 4 to JUnit 5. Don’t miss out—your answers are just ahead!
People Also Ask:
Can I run JUnit 5 tests in Eclipse and IntelliJ IDEA?
Yes, both Eclipse and IntelliJ IDEA provide out-of-the-box support for JUnit 5. To run tests smoothly:
- Ensure you are using the latest IDE version.
- Add JUnit 5 dependencies in Maven (pom.xml) or Gradle (build.gradle).
- Use the built-in JUnit 5 Test Runner for seamless execution.
Can JUnit 5 run tests in parallel? If so, how?
Yes, JUnit 5 enables parallel execution, which helps speed up testing, making it ideal for Maven integration tests and Gradle integration tests.
To enable parallel execution, add this setting in junit-platform.properties:
junit.jupiter.execution.parallel.enabled = true This optimizes test performance and reduces execution time for large-scale enterprise applications.
What is the default execution order of JUnit 5 tests?
JUnit 5 does not enforce a specific test execution order. However, you can control it using:
@TestMethodOrder(MethodOrderer.OrderAnnotation.class)
@Order(n)
This ensures tests run sequentially, which is useful for integration testing in Java and scenarios requiring dependent test execution.
Can JUnit 5 be used for UI testing in Java applications?
JUnit 5 is mainly for unit testing, but it can be integrated with Selenium, TestFX, or other UI testing frameworks to validate Java-based graphical applications effectively.
How do I migrate JUnit 4 tests to JUnit 5 efficiently?
Replace JUnit 4 annotations (@Test, @Before, @After) with JUnit 5 equivalents (@Test, @BeforeEach, @AfterEach), update dependencies, and use JUnit Vintage Engine for backward compatibility.

%201.webp)